
It’s vital to install WordPress locally. This local installation can be a copy of a live site or simply a fresh WordPress installation. If you install WordPress locally, you have the freedom to experiment with themes and plugins. You can also discover different ways to make your site more secure.
Luckily, you can easily download and install WordPress locally. I’ll walk you through the process step-by-step. At the end of this guide, you can set up WordPress locally on Mac and Windows.
Why Should I Setup WordPress Locally?
I am sure you have done your research and come across various hosting providers offering WordPress-dedicated hosting. The WordPress hosting package may intrigue you to start a WordPress site instantly, but I must urge you to wait.
When I first began working with WordPress, I did so with a local installation.
A local installation is simply a technical way of saying:
Download and Install WordPress on Your Local Computer Instead of a Web Server
Should I Install WordPress on a Local Server or Online? What Are the Different Advantages?
Before we begin with the core of this guide, I want to stress the advantages a local installation provides.
You may have read and heard different views about this.
Some may say:
There Is No Difference or No Real Best Practice
Whereas some individuals would ramp on and on, saying stuff such as:
WordPress Sucks! It Is a Targeted Platform for Hackers! Blah, Blah, Blah..
Well, I am going to burst their bubbles!
5 Benefits and the Reasons Why I Setup WordPress Locally:
- A local WordPress development environment frees you from connectivity issues and allows you to work offline.
- You can test your installation, WordPress updates, themes, and plugins without the world knowing about your fumbles.
- You can build an entire website locally without going through the process to stop search engines from crawling your site.
- You can experiment with different plugins and best practices regarding WordPress security.
- I have a backup of my complete WordPress site on my local computer.
The list can continue to grow, but I don’t want to bore you.
So, let’s move on to why you are here: how to download and install WordPress locally.
How Do I Download and Install WordPress Locally?
It is easy to download and install WordPress locally. However, WordPress isn’t a download-and-start CMS. If you want to run WordPress locally, there are a few prerequisites that you must fulfill.
It is best to follow along to ensure you satisfy all the requirements to set up WordPress locally. By the end of this guide, you will have a fully functional WordPress installation on your local machine. It will allow you to develop and test your website before going live.
Here is a step-by-step guide on how to install WordPress locally. Don’t worry because it will not take much time, and I will try to explain it in simple words.
Step 1: Download WordPress Locally
To download WordPress, head over to the WordPress download page to get the latest version of WordPress.
You will get a zip file that will be approximately 25MB. It should download within seconds.
Step 2: Download a Local WordPress Development Environment
A local WordPress development environment means setting up a local server environment on your computer.
A local server means the software you will install on your computer. This software will provide services similar to hosting companies to run a WordPress site. The difference is that the setup is on a personal computer. Hence the term “local server” or “local WordPress development environment.”
Let’s first begin by downloading a local WordPress development environment.
Please note: there is no best local server for WordPress.
There are three popular local development environments. You need to choose the one that is compatible with your operating system.
These names may seem hilarious, but they are actually acronyms for local servers. The first letter identifies the operating system.
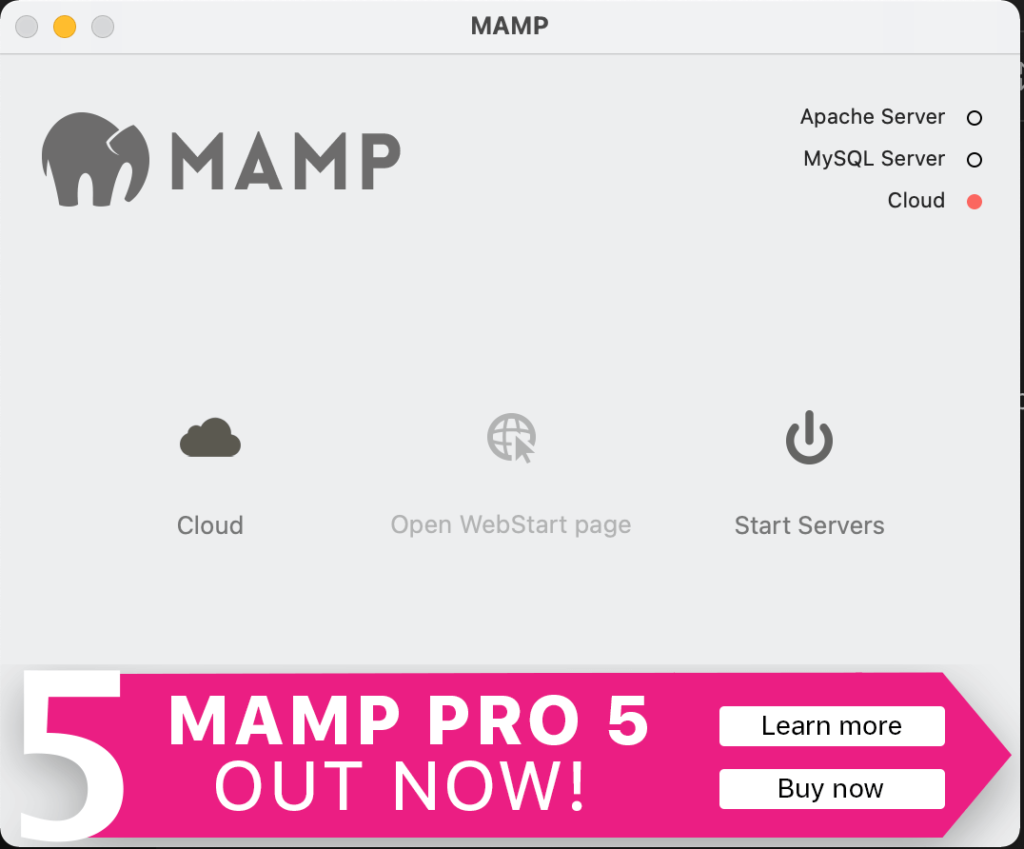
MAMP stands for macOS, the operating system; Apache, the server; MySQL, the database; and PHP, the programming language.
WAMP is for the Windows operating system, and XAMPP is for Linux, Windows, and macOS.
However, MAMP is now available for Windows as well. I use MAMP to set up my local development environment.
Step 3: Install a Local WordPress Development Environment
Once you have downloaded the server of your choice, run the installer and follow the on-screen instructions. It will only take a few minutes to install the local development environment.
The on-screen instructions are straightforward. You do not need prior web development knowledge. Just click on the next button. You don’t need to configure the settings or wonder what they are for.
The only work you might need to do is when you reach the installation step. You must decide in which folder you want to set up the local environment. By default, the installer will choose a folder for you, but you can create and save your installation there.
For example, you can create a folder and label it MAMP WordPress.
When you reach the last step and click the finish button, it will open the local server control panel.
Heads up! If you are using WAMP or XAMPP, the control panel may resemble something out of a sci-fi movie.
You can turn your local server environment on and off from the control panel. To run your WordPress site, you must turn it on.
Press the start button to run the Apache and MySQL servers.
Step 4: Install WordPress
There are four steps to installing WordPress.
1.) Extract the WordPress Files
The first step is to extract the downloaded WordPress files to the htdocs folder of the installation directory.
Open the server installation directory and search for the folder htdocs. Open that and extract the WordPress zip files there.
When you extract the files, they will have the same name as the zip folder. For example, if the zip file name is WordPress-6.4.1, the folder name will be the same.
The name of the folder represents the name of your website. When working and installing locally, this isn’t a problem, but you should change it. Every time you run your local WordPress website, you need to type in the name WordPress-6.4.1, and this doesn’t look nice, right?
So, change the name to the actual name of your website. I always do it whenever I create a new website on my local computer. It will be very confusing if you have a list of local WordPress sites. You would then need to open each site individually to find the one you have to work on.
Therefore, naming the site is crucial, even if you are working locally.
2.) Create a Database
Start your local development server. Then type localhost/phpmyadmin in the browser URL. If you are using a Mac, the URL will be http://localhost:8888/phpmyadmin/.
Press enter, and this will launch the PHP MyAdmin interface. Click on the databases tab to give your database a name, and click the create button.
This will create your new database automatically. Your new database will appear in the left column. Note down the database name because you will add it during your WordPress installation.
3.) Installing WordPress
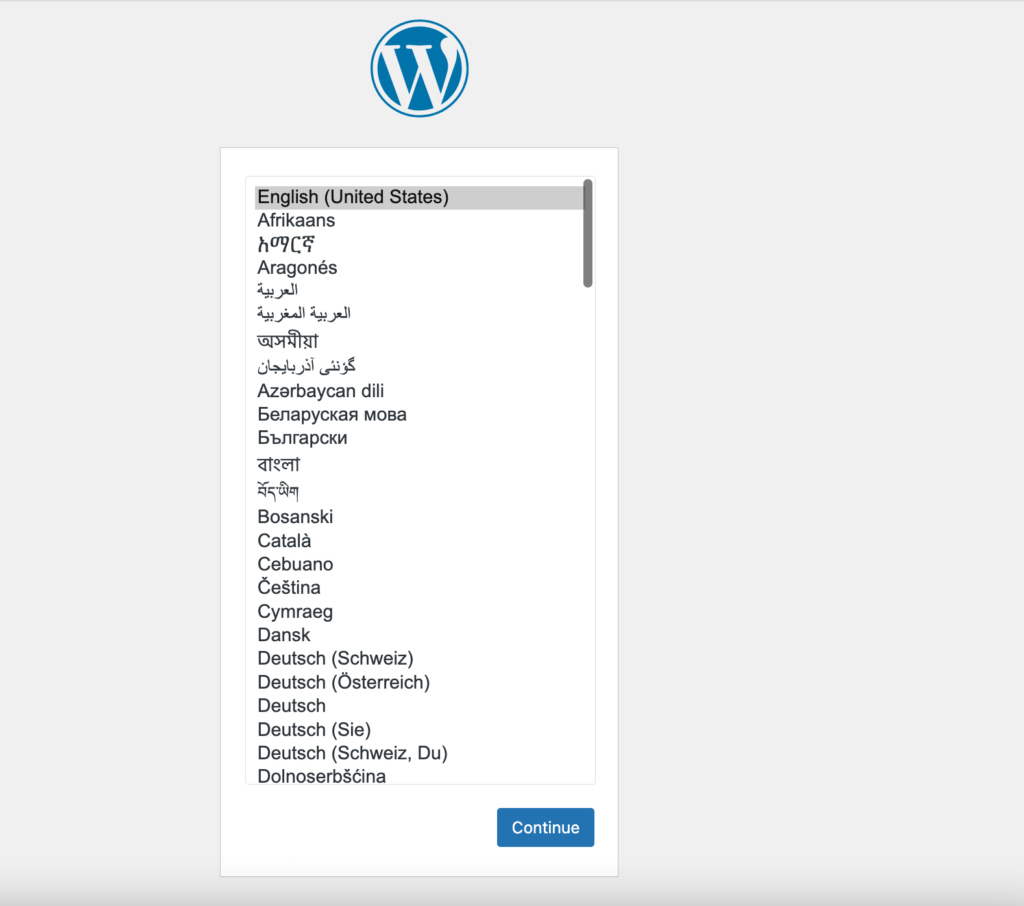
Enter localhost, then the name of your website, in your browser.
If you recall, in step 1, I told you to change the name of the folder from the default WordPress name, WordPress-6.4.1, to the name of your website.
So, whatever name you have chosen, you need to write in the browser localhost/yourwebsitename and press enter. If you are using the MAMP server, type in localhost:8888/yourwebsitename and press enter.
You will see the WordPress setup interface, which will begin by selecting a language. WordPress is a multilingual CMS, so you can choose your preferred language from the list and then press continue.
After you click on continue, you need to connect the database to your WordPress site. You already created the database in the second step, so don’t worry; the overall process is straightforward.
Over here, you only need to connect the database to THIS WordPress installation.
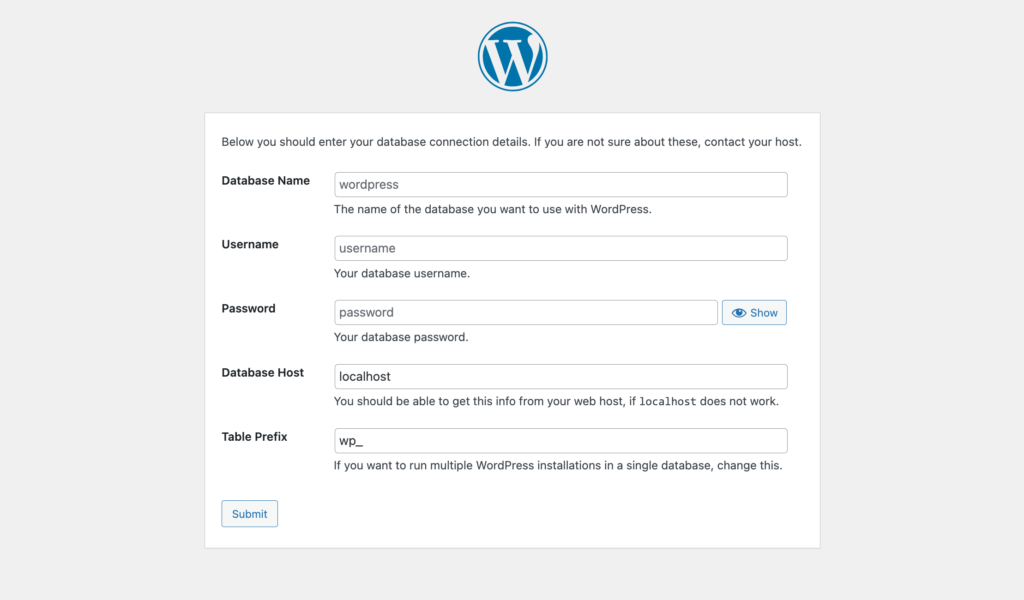
You need to enter the following:
- Database name
- Database username
- Database password
Database Name
You already have the database name in step 2. Remember when I told you to copy and save the name? If you didn’t type the name in your notepad, don’t panic. Head back to the PHP Myadmin interface using the following URL:
Mac
http://localhost:8888/phpmyadmin/
Windows
Copy the database name, which you can find in the left column.
Database Username and Database Password
You are probably wondering where this information is because the credentials were not created during the database creation process.
Yes, you are absolutely right.
We can’t add a database username and password because both of these values are prefixed.
The database username and password are always root.
Click on submit, and you will get the famous “All right, Sparky!” message. Run the installation to install WordPress locally.
4.) The Famous Five-Minute WordPress Installation Process
You are close to installing WordPress. You need to fill in the basic information about your WordPress website.
- The site title will be your website name.
- The username and password will be your WordPress admin login details.
- You need to enter your email address.
- It doesn’t matter if you check or uncheck the search visibility because your website is not live.
Thats it! Welcome to the final step. Click on the install WordPress button and you will have your own local WordPress site on your computer. You can now log in to your WordPress admin panel using your username and password.
Conclusion
Following these easy steps, you can download and install WordPress locally. Whether you are using a Mac or a Windows machine, you can run WordPress. You only need a local WordPress developer environment, and it will allow you to set up WordPress locally. You do not need an internet connection. With a few clicks, you can install WordPress within seconds.