A website must handle and organize media files effeciently. Especially if you have launched a WordPress blog. The WordPress media library comes with basic features, making it easy to handle media files. The basic functionalities are:
- Upload
- Edit
- Download
- Delete
If you want to know how to start a WordPress blog within a month, it is vital to go through the basics. Without a good grasp of WordPress, you will spend time learning instead of writing blog posts.
This guide isn’t an introduction to the WordPress media library. I am not going to explain how the interface works. The primary focus of this guide is the basics of WP media file handling. You will learn everything in this guide.
Why Is WordPress Media File Handling Important?
Some may think that spending time learning about the WP media library is a waste. I was one of them. When I tutored myself on WordPress, I only went through the basics of media file management. I wrapped it up in a few minutes.
However, certain circumstances forced me to visit the media library multiple times, and during this process, I learned a lot.
Here are six reasons why WordPress media file handling is important.
- You can download all your media files.
- You can quickly access your media files when you need them from the media library.
- In the WordPress media library, you can drag and drop files and do other things with the library.
- You get access to the library from your website’s dashboard after logging in to your website.
- Switching between the list view or grid view lets you see pictures, videos, and other file types.
- You can upload multiple files in any format that suits your needs.
The WordPress media library improves your media control and makes it a wonderful experience to stay on top of media files.
Uploading Media to WordPress Media Library
The question new web administrators ask is: how do I upload images on a WordPress website?
The obvious answer is uploading the images via the media library.
However, WordPress offers two ways to upload media.
- Inserting an image into your post or page
- Uploading the image via the WP media library
Both are easy and quick. Within a few steps, you can upload media to your website.
Inserting an Image Into Your Post or Page
Here are the steps you need to take to upload images directly from your post or page.
1.) Open the post or page. I am using the default WordPress Gutenberg editor.
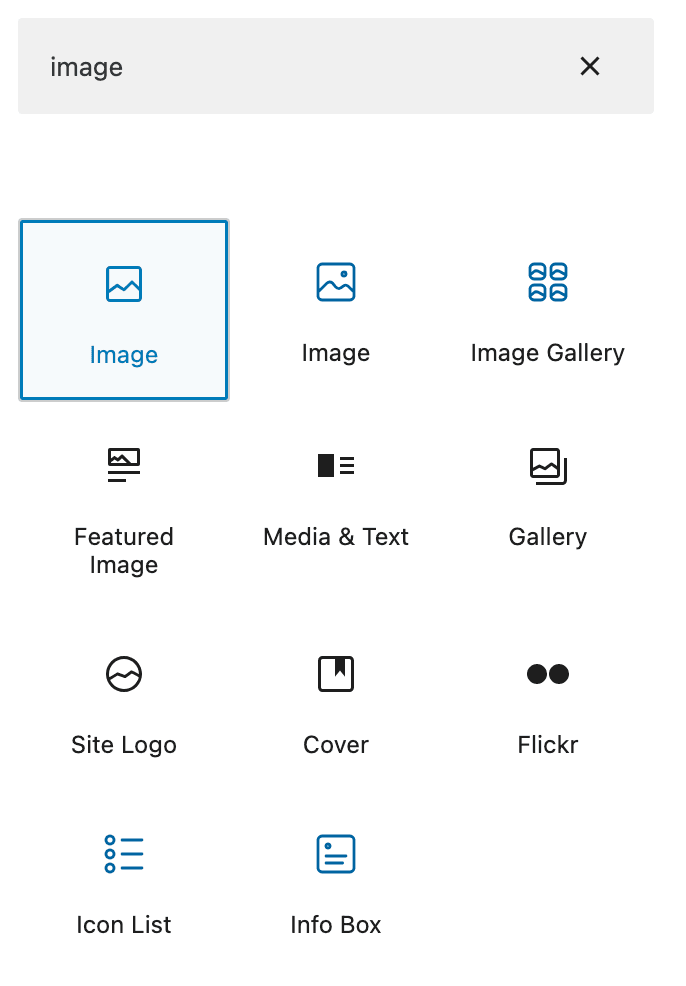
2.) Click on the “+” icon and search for the Image block.
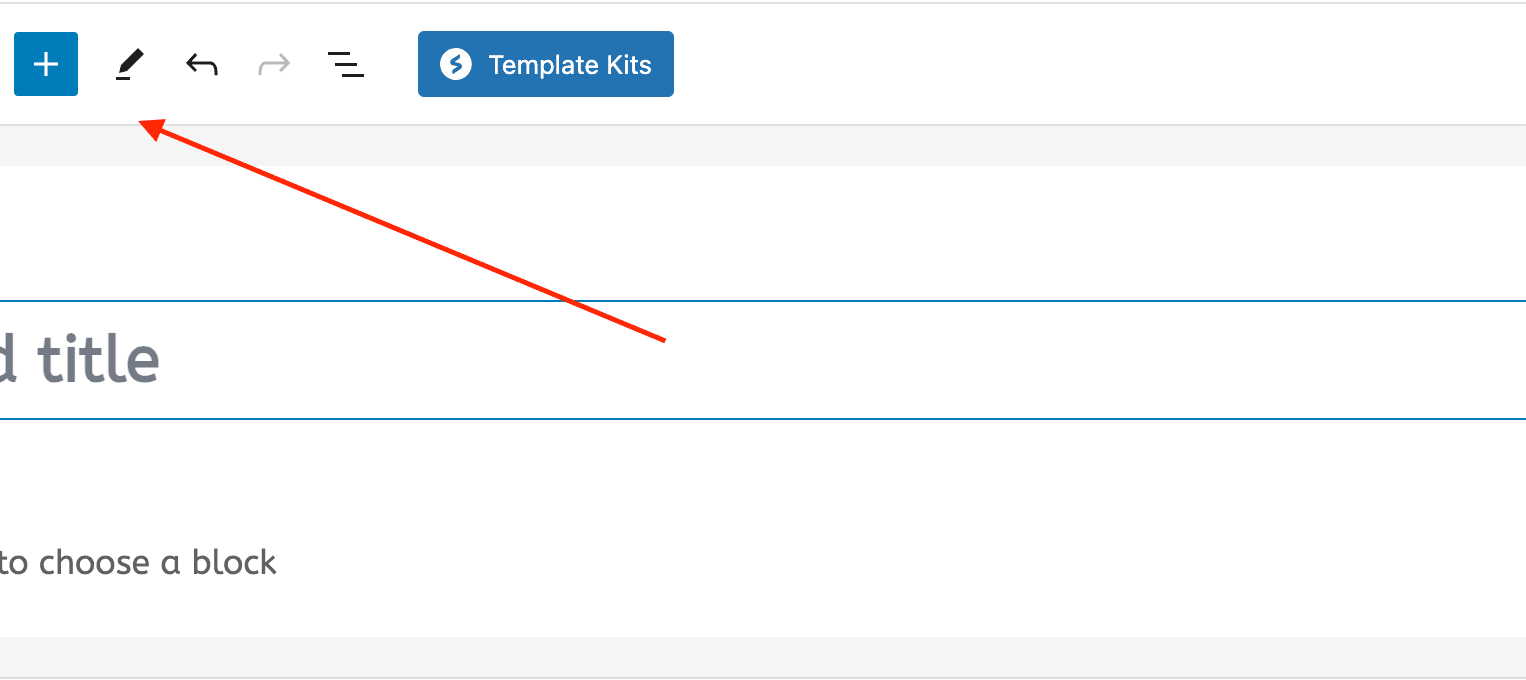
3.) Drag and drop the image block into your page and post, and click the Upload button.
4.) Choose which images you want to upload from your computer.
5.) Any image uploaded here will appear in the library.
Uploading the Image via the WP Media Library
Uploading via the WP media requires fewer steps compared to inserting an image into a page or post.
- Navigate to Media –> Add New Media File.
- From there, drag the files to upload from your computer or click on the Select Files button.
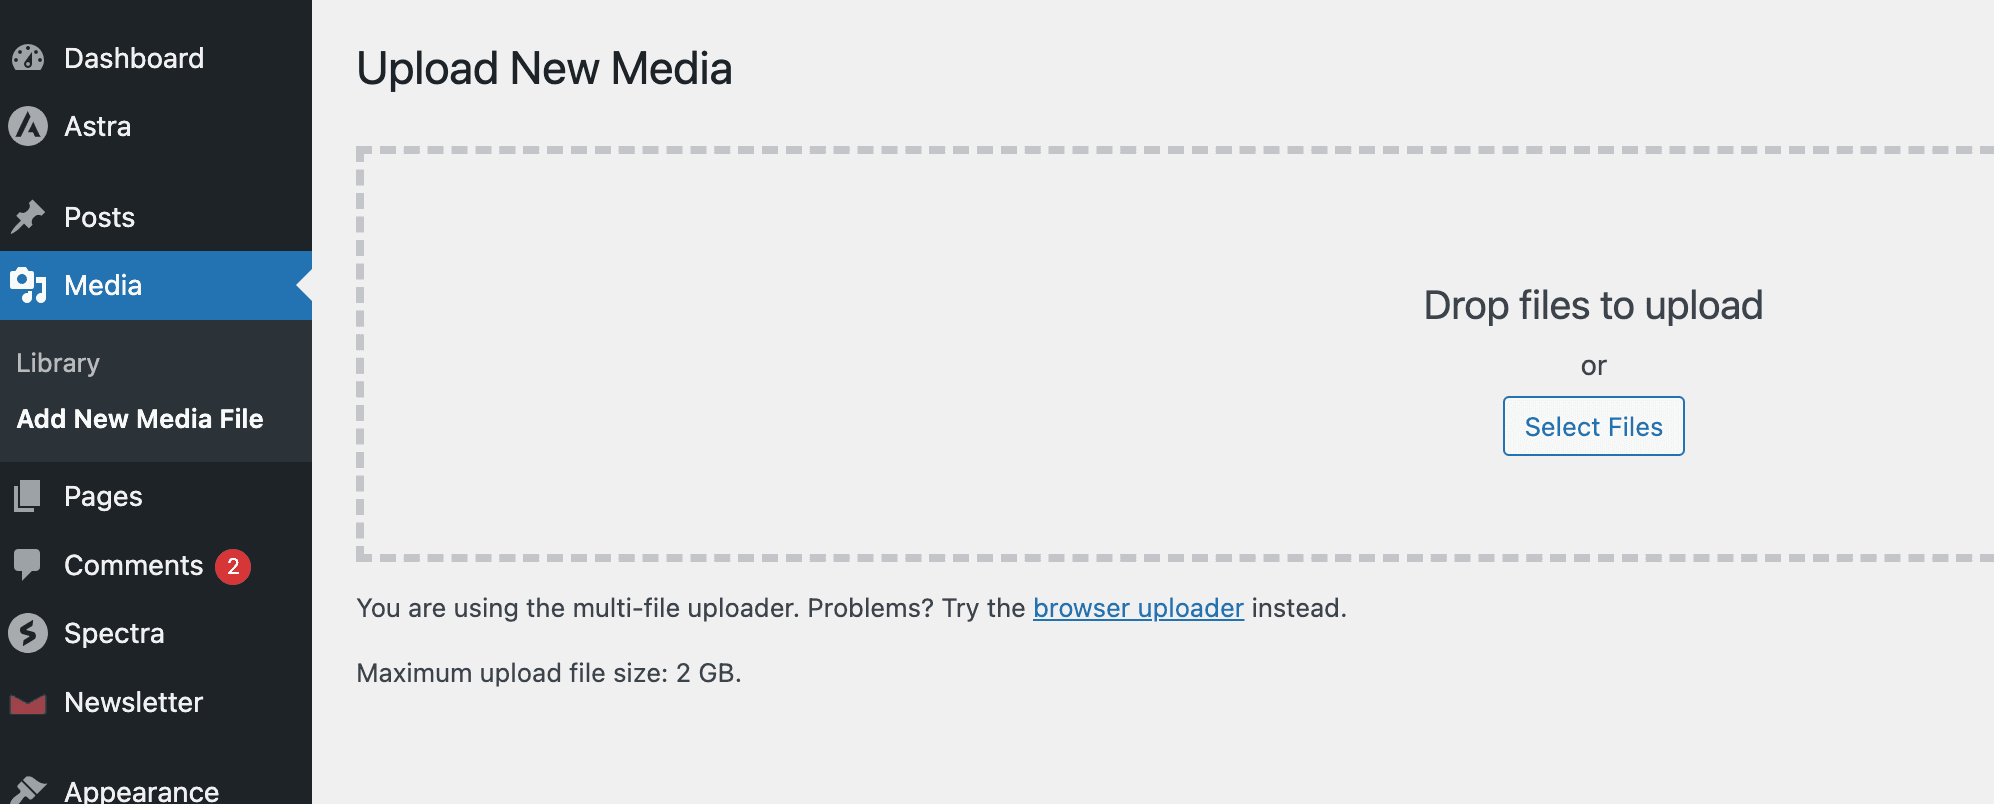
Within two steps, you can upload files.
A word of caution: if you own the image, it’s good. If not, always ensure you have permission to use any media before uploading it.
You can also bulk upload images by selecting multiple images at once.
Editing Media in WordPress Media Library
The built-in WordPress editing media helps edit images for your content. You don’t need to download any plugins. The WP image editor lets you fix and adjust any image.
With this built-in features it is easy to crop, rotate, flip, and scale the image from the media library. You also have the option to redo or undo your image edits.
How To Do Basic Image Editing in WordPress?
Navigate to the WP media library and select an image you want to edit. There will be an edit image button at the bottom. Click on the Edit Image button below the image preview. This button will open the WordPress built-in image editor.
You will see the image editing options once the WP image editor opens up.
Crop
This option helps you crop the specific area of the image you want to focus on. Use your cursor to select the crop selection. You can drag and drop the edges to change the size of the image. Click on the crop button to finalize the change and save the changes.
Rotate
The rotate button in WordPress allows you to rotate the image counter-clockwise and anti-clockwise. You can rotate the image to the left or right at an angle of 90 degrees.
Flip
The flipping buttons in the WP image editor allow you to change the orientation of the image. It has two options: vertical and horizontal. This action comes in handy when you want to rotate the vertical image to a horizontal position or the other way around. The vertical position will show the bottom of the image at the top. If you flip the image in the horizontal position, the left side of it will now show on the right side.
Scale
The scale image option helps you proportionally resize the image manually. If you enter the height value, the WP image editor will automatically enter the width value, and vice versa. Press the scale button to change the image size in WordPress.
Why Are My Images Not Cropping in WordPress?
The WordPress video library lets you make small changes to the image you’re working on. Editing includes turning, rotating, scaling, and cropping.
When you try to crop an image, you might get the message:
“There was a problem cropping your image.”
The error message tells you that you are missing some conditions to finish the cropping command.
To overcome this problem, here are a few things you should investigate:
- First, make sure that image cropping is enabled. Cropping is a default behavior, but sometimes, the theme settings may have an option related to cropping that may be disabled.
- Make sure that the PHP version you’re using is not too old. If the version of PHP that runs your website is too old, some of its features will not work right.
- There could be a plugin conflict. Disable the plugins one by one to see if it fixes the cropping issue.
Downloading Media
Sometimes, you may need to download your media files from the WordPress library. You can download the image from the front end of your site by right-clicking on the image and selecting the Save Image option.
However, there is a way to do it from the WordPress admin panel. But before that, let’s dive into the benefits of downloading WordPress media.
Benefits of Downloading the WordPress Media Library
It may not seem like it but downloading the WordPress media library has certain benefits. Some of the reasons are:
- Backup
- Migration
- Reuse of content
- Offline access
Backup
Backup doesn’t necessarily mean creating a backup of the WP media manager only. You can backup your entire website and can get the individual media from the folder. When you download the media library, you will save all your content to your computer.
Migration
It is crucial to keep a backup if you want to protect your material or move your files to another site. It takes a lot of time to download each piece of information one at a time.
Offline Access
Having a backup will help you get access to your files even when there is no wifi connection. It is especially beneficial if you want to edit your media using a more powerful editor or create presentations.
How Do I Download the WordPress Media Library?
There are two ways you can download the WordPress media library.
- Use the built-in export feature.
- Use a plugin
Built-in Export Feature
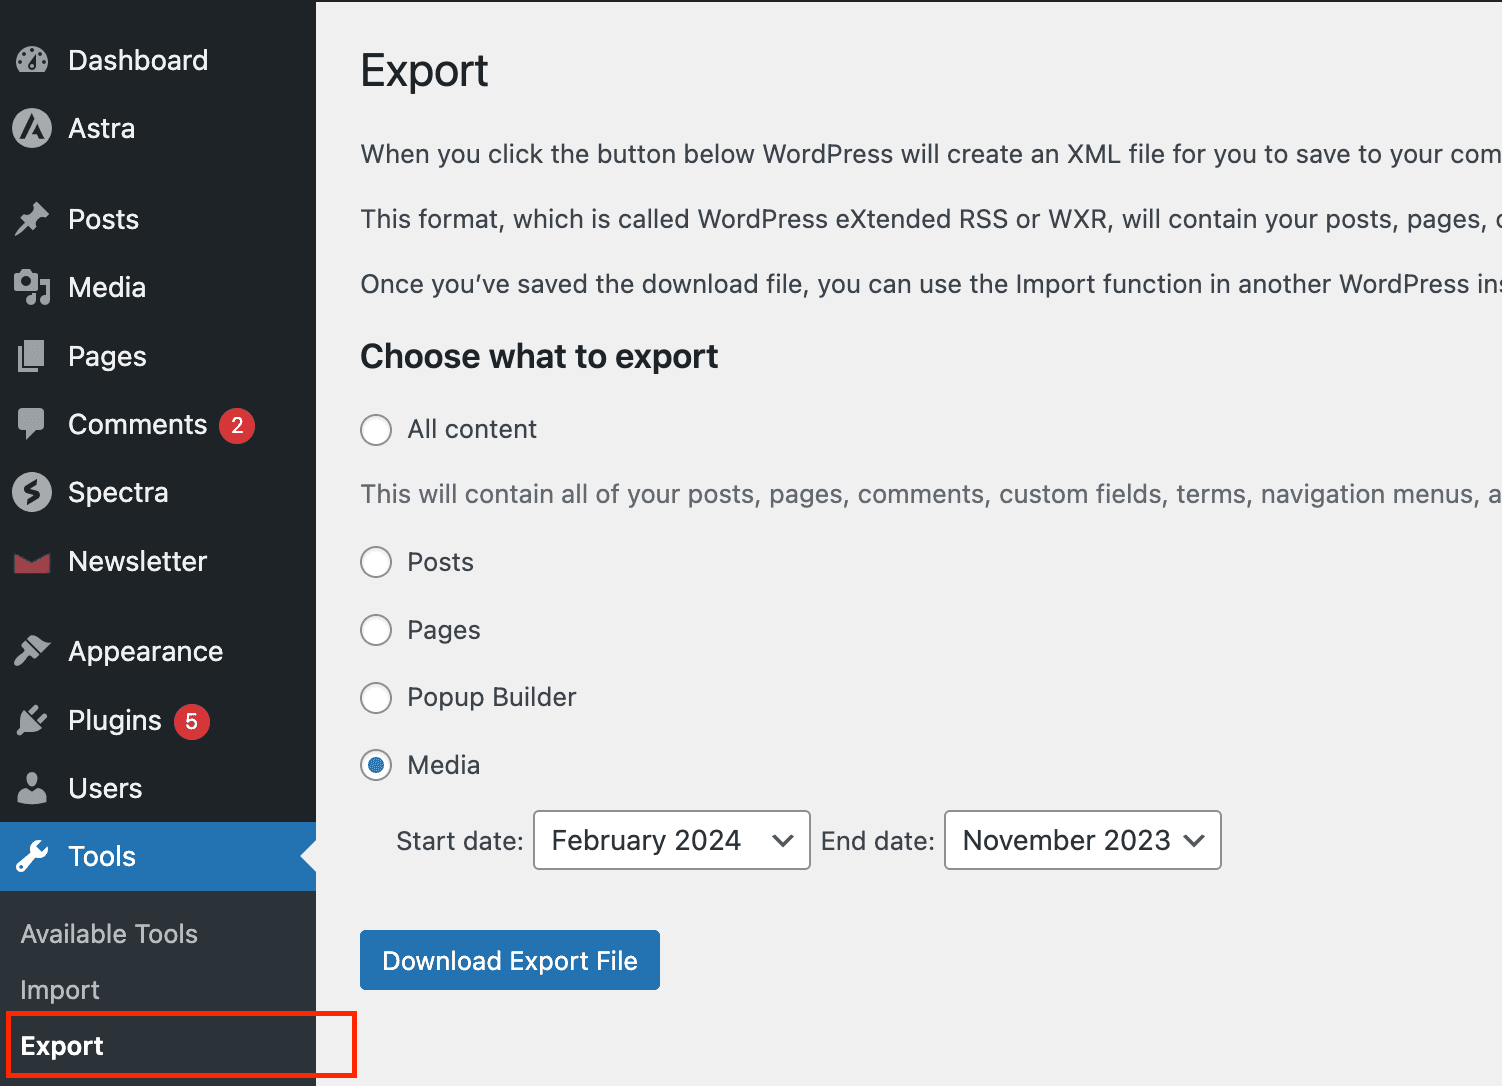
WordPress platform has a built-in export tool to help you download all the files from the media library. Here is how we go about it.
- Go to the WordPress admin dashboard.
- In the admin dashboard, click on Tools → Export.
- Check the box next to the media option.
- Select the start and end date from the drop-down menu.
- Click the download button to save all your files.
Updraft
The free version of UpdraftPlus backs up and moves your website. In the paid version, you can do more things. It’s one of the most-used plug-ins for regular backups and migrations.
How to install UpdraftPlus?
- Get the Updraft plugin from the WordPress plugin directory and install and activate it.
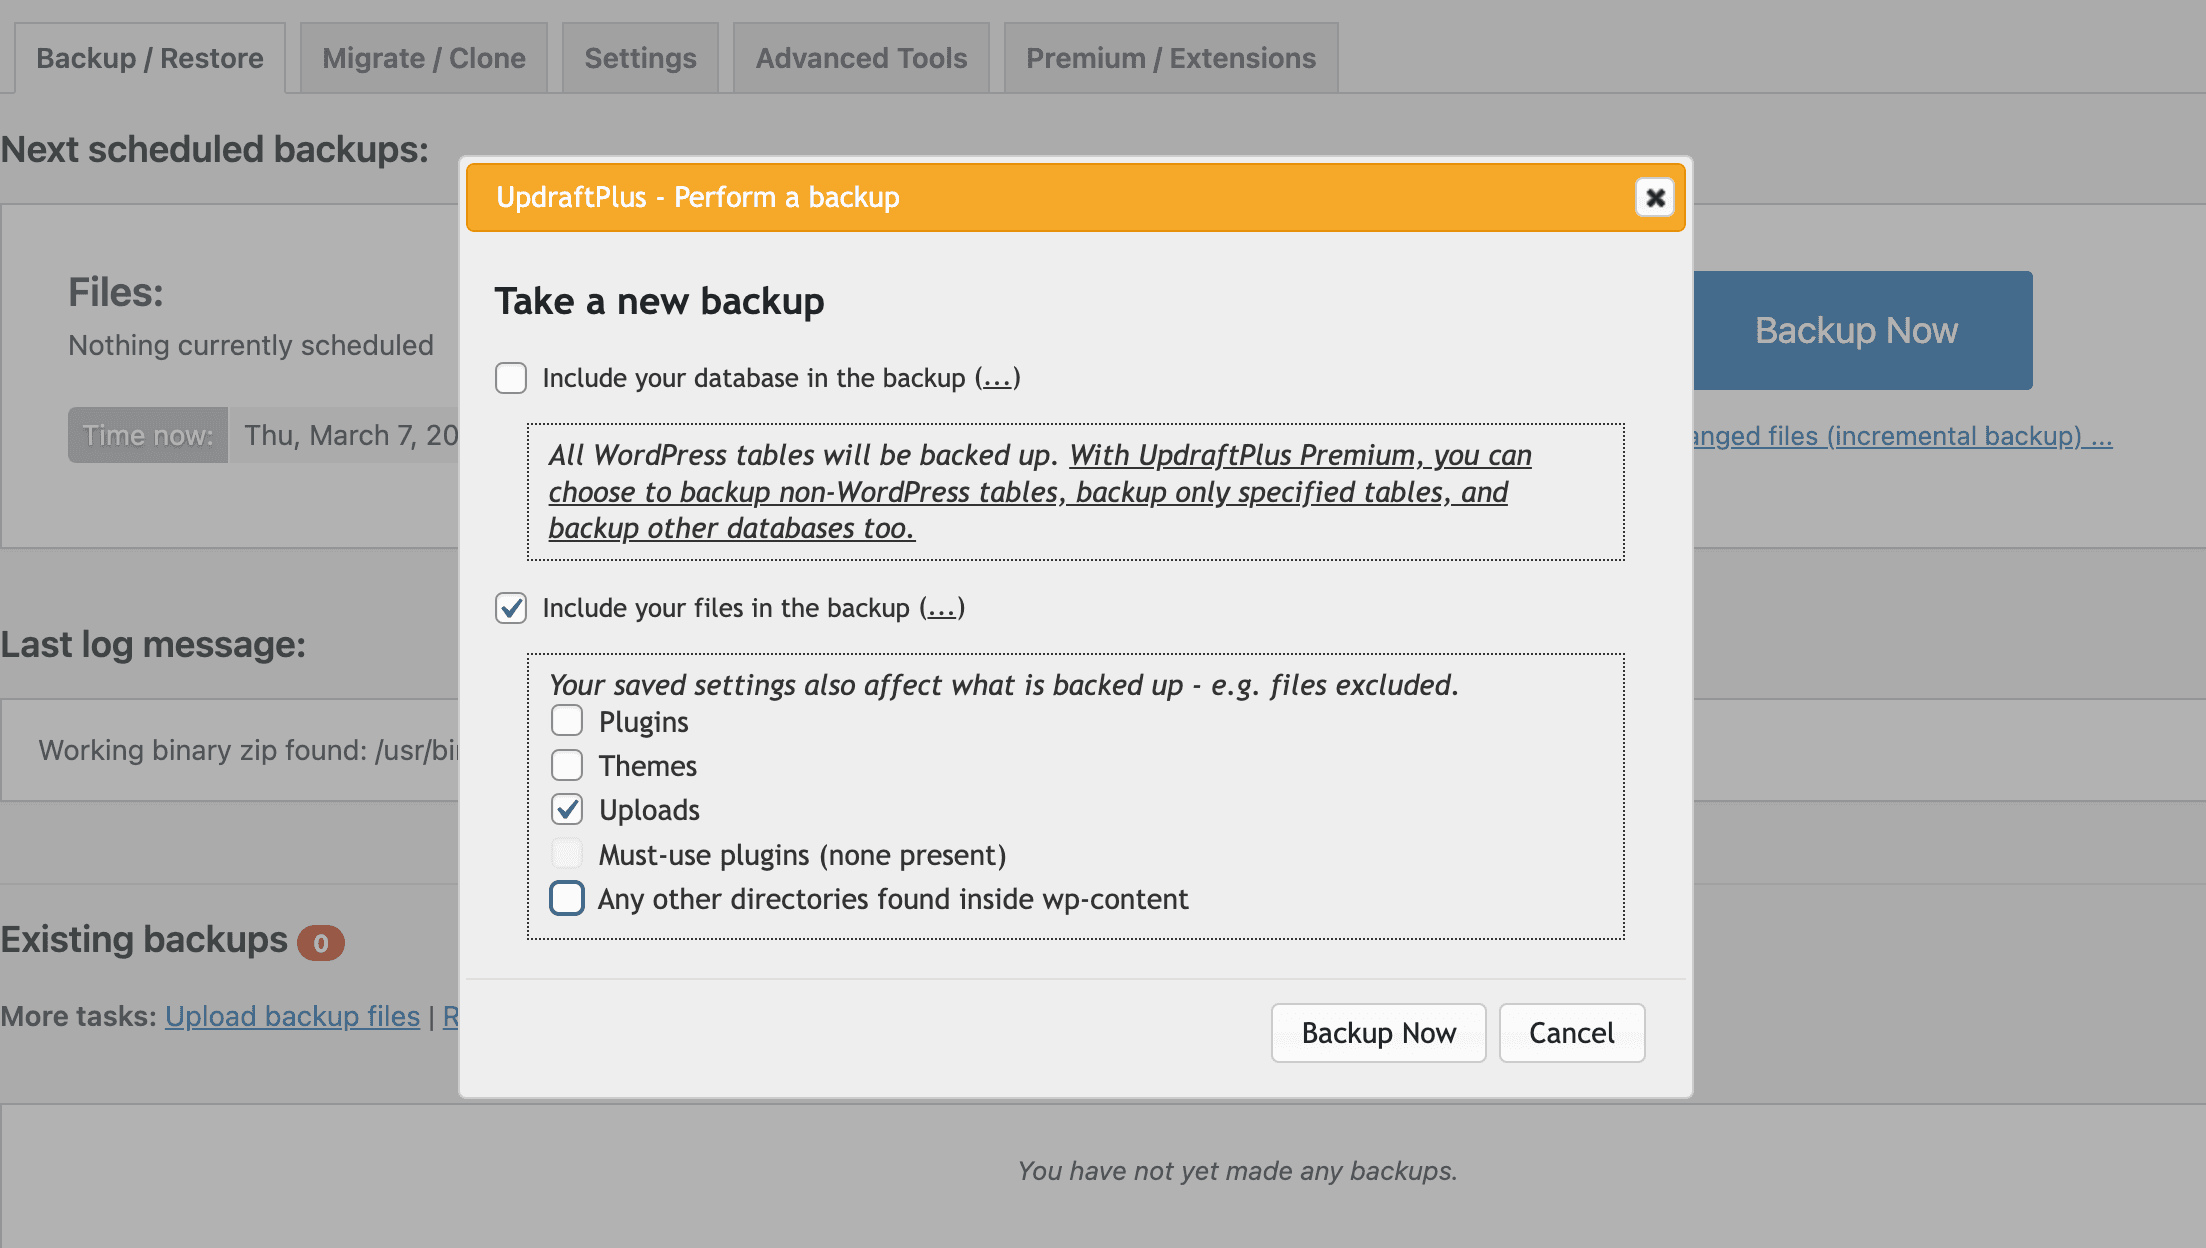
- To back up your WordPress site with Updraft, go to the homepage and click on Settings –> UpdraftPlus Backups.
- The Backup/Restore tab is here. You can start backing up your files by clicking the “Backup now” button.
- Look for the icon that looks like an ellipsis ‘(…)’.
- The ‘(…)’ button will give you a few options for the kind of file you want to back up.
- Look for the “Uploads” checkbox button.
- To back up your files, click the “Backup Now” button.
- When the backup is complete, click “Upload” to get your files from the backup area.
- After that, click “Save to your computer.”
- You can find the copy of your files on your computer in a single zip file.
Deleting Media
Over time, your WordPress media files will get bigger. The over-storage will make your site load more slowly. There isn’t enough space to store everything because of the extra files. In this case, you must remove all the duplicates and old files you don’t need in your media library.
When you are ready to get rid of files you no longer need, it is smart to make a copy of your site because deleting the file is a permanent move.
How Do I Delete Files From Media Library in WordPress?
Deleting files from the WordPress media library is a simple process. In the list view you can easily select and bulk delete media content.
Choose the media you want to remove by clicking on the checkbox. Once you select it, in the dropdown field choose the option Delete Permanently and click on the Apply button.
It will delete all of the selected media in the WordPress library.
How Do I Allow WordPress to Upload All File Types?
WordPress lets you add a lot of different types of files. Here is a list of some of the types allowed by the WP media library.
Audio:
- .mp3
- .m4a
- .0gg
- .way
Video:
- .mp4
- .m4v
- .mov
- .avi
- .wmv
- .3g2
- .3gp
- .ogv
- .mpg
Images:
- .jpg
- .jpeg
- .png
- .wep
- .gif
Documents:
- .doc
- .docx
- .ppt
- .pptx
- .ppsx
- .pps
- .xlsx
- .xls
- .odt
Apart from the allowed types, there may be some files you wish to upload, but the media manager may not allow it. It will inform you that you can’t upload that file for security reasons.
I will explain how you can fix this problem and allow WordPress to upload all file types in two ways.
Upload Additional File Types Using a Plugin
Plugins are a great way to enhance the functionality of your WordPress website. You don’t need to hire WordPress plugin developers because there are free plugins available. You only need to install and activate them. The whole process hardly takes minutes to finish.
The plugin demonstrated for this tutorial is the WP Add Mime Types.
- Make sure it is compatible with the latest version of WordPress, and then install and activate the plugin.
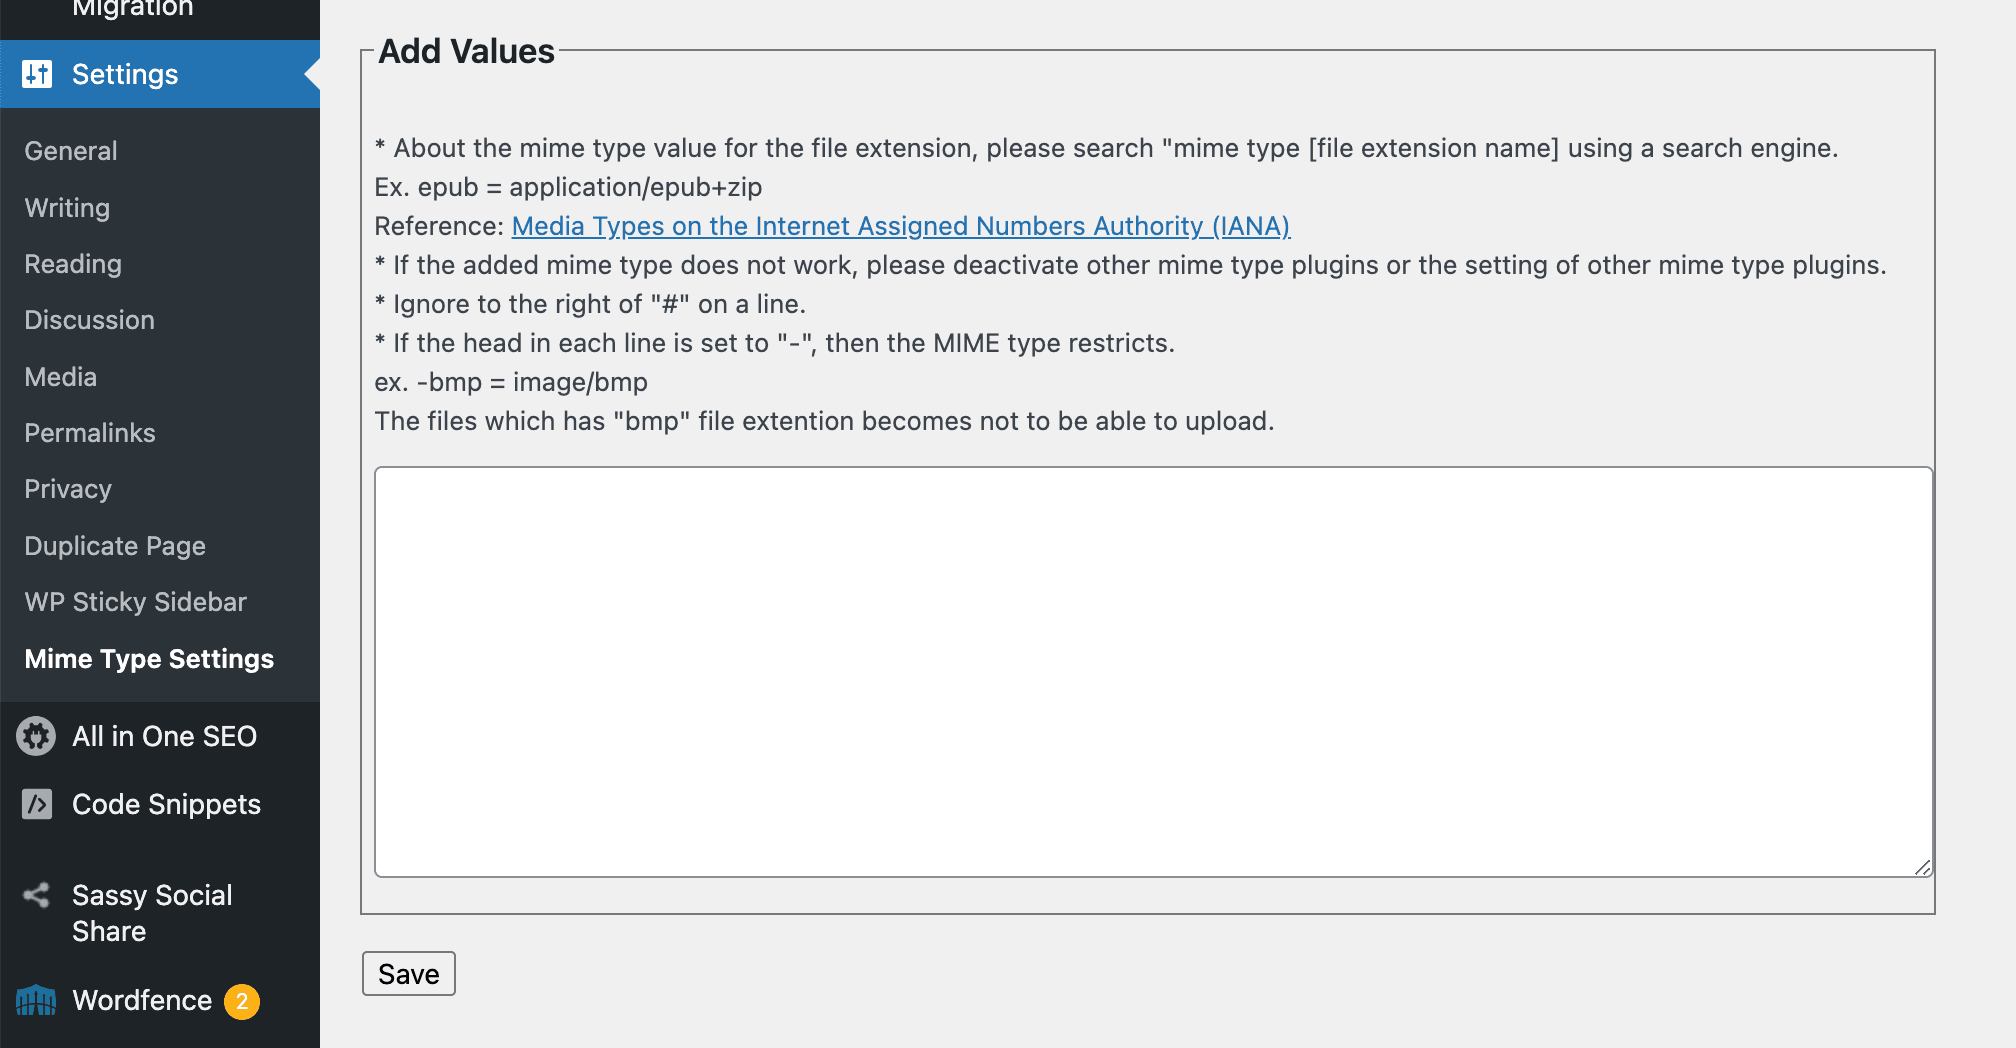
- Head over to Settings –> Mime Type Settings.
- It will show you a list of allowed mime types and file extensions by WordPress. Scroll down to the latest section, titled Add Value.
- Enter the file type you want to allow the WordPress media library to upload.
- Save your changes. To ensure that the restriction is removed, upload that file to the WP media library.
Edit the WP-Config File
Editing the wp-config file is a simple process. You only need to write a single line of code. After that you can then upload restricted file types in the WP media manager.
You need to access your website files, which means you need to access your web server. In this example, I will explain how to edit the wp-config file using Hostinger.
You can follow this example even if you are using the services of another web provider.
- Login to your hPanel. It is another name for cPanel. Since it is from Hostinger, they have named it hPanel, and it comes with various useful features that make it stand out.
- Click on Websites –> Manage.
- After that, click on the File Manager link.
- Open the public_html folder and then open the wp-config file.
- Paste the following code in the wp-config file and save your changes.
define('ALLOW_UNFILTERED_UPLOADS', true);There are other ways as well. However, these two are the most straightforward methods to allow all types of WordPress media to be uploaded.
Once you have uploaded the required file types, WordPress security suggests revert the changes for safety reasons.
Why Are Images Not Uploading to WordPress?
Sometimes, for some reason, when you upload images to WordPress, you encounter an error. This error message may be due to:
Incompatibility of File Formats
WordPress supports PNG, JPEG, and GIF in the media library. Make sure the images you uploaded are in these formats for error-free uploading or allow WordPress to upload all media types.
PHP Memory Allocation
WordPress runs on PHP, a scripting language. This system requires a certain amount of memory space to process the uploading process. Go to your server settings and increase the PHP memory limits to fix the problem.
Size Limit
Every WordPress site supports a set file limit for uploads. If your file exceeds these limits, you will face upload issues. Before uploading the images, change the image size in WordPress. Make sure you are working with the latest PHP version.
File Permission Problem
Correct permissions are essential for uploading the images. Go to the server settings to check the permissions.
Should I Upload Videos to WordPress?
No, you should not upload videos to the WordPress media library. However, your WordPress blog should have videos. Uploading videos to your website makes it look attractive to visitors. Moreover, instructional videos make it easy to grasp and retain information.
According to statistics from Speach:
- Viewers retain 95% of video messages.
- 80% recall the video they viewed.
- Viewers are 27 times more engaged in videos.
So, you may be thinking: why shouldn’t I upload videos to WordPress if it has a high engagement rate?
Here are the cons of uploading videos to your WordPress website:
- Uploading videos requires more bandwidth. The higher the video quality, the more bandwidth it uses, resulting in more expenses.
- It slows down your website.
- Different browsers have different requirements for video formatting. The viewers will have difficulty viewing the video according to their browser configurations.
- You may need video player software.
- Preloading videos may cause a lot of data usage.
So, instead of uploading videos, it is best to consider other alternatives.
How Do I Upload a PDF Document to WordPress?
The method of uploading a PDF document is easy. It’s similar to uploading images or videos.
- The first step is to log in to your WordPress dashboard.
- Navigate to Media and click the Add New button.
- Select upload files; this will give you access to the computer to find the document you want to upload. Select the PDF you want to upload and click open.
Conclusion
The WordPress Media Library is the central hub of all your media files which are displayed on the website. Many are not aware of the built-in features that WordPress offers. For this reason this guide has covered all vital points related to the WP media manger.
You will learn how to:
- Navigate the media library
- Upload media
- Edit media
- Delete media
- Download the WP media library
- Troubleshoot common problems
By mastering these skills, you can effectively manage your media content, improve website performance, and enhance the overall user experience.

