
At the time I am writing this tutorial, I am creating a Google Analytics account for my website from scratch. So, all of the steps shown are based on the actual account setup process and I will provide a complete practical example of how to set up Google Analytics. I am going to create a GA4 account for my website. Please follow along with this tutorial, you will learn how to create and add Google Analytics to your website in 30 minutes.
Google Analytics is a great tool to see a complete report of your website’s activity, especially tracking the number of visitors who are viewing your site, what page they are on, and their geographic location. According to a survey, more than 28 million sites are using this tool. If you don’t know how to create and add a Google Analytics tracking code to your website, don’t worry.
Here is an overview of what you will learn:
- What is Google Analytics?
- How to create a Google Analytics account for free?
- How to add a Google Analytics tracking ID to a website?
Google Analytics Frequently Asked Questions?
But before we dive into this tutorial, there are some FAQs that I want to answer first. If you already know this, you are welcome to skip this FAQ section.
What is Google Analytics?
Google Analytics is a free web analytics service. The purpose of this tool is to track and provide a comprehensive report of how many people visit a website. The report not only displays the number of visits in a single day, but the date can range all the way back to months.
Is Google Analytics free?
Yes, it is free to create an account and free to add the tracking.
Do I need a Gmail account for Google Analytics?
No, both of these accounts are different. However, you do need a Gmail account to access Google Analytics and create an account.
How to install Google Analytics?
There are two ways to add Google Analytics tracking code: automatically and manually. This tutorial will cover both of these points in detail.
Do I need the tracking code on every page?
Unless you have created a static HTML website, there is no need to add the tracking code to every page. If your website is created in a CMS such as WordPress, you only need to add it once. in the <head> section, and it will show up on every page.
How do I know if my website is connected to Google Analytics?
You can check the report in your Google Analytics account. If the report does not display any data it means that your site is not connected.
So, now that these basic questions are answered, let’s move on to the practical part of this tutorial which is to create a Google Analytics account.
How to create a Google Analytics account?
Step 1: Log in to Google Analytics
To create an account, the first thing you need to do is navigate to the official Google Analytics website. If you are not logged in with your Gmail account, you will be redirected to the Google sign-in page. You must sign in first to continue with Google Analytics.
Step 2: Create an account
Once logged in, you may visit one of the following pages:
- The Google Analytics home page, displaying the message “Welcome to Google Analytics. To set up your account, click on the Start measuring button”. This page will appear if you are creating an account for the first time.
- If you already have a Google Analytics account, you will be taken to the dashboard for that particular account. From there, you have to create a new account for your website. To create a new account, click on the Admin button, which is the gear icon in the bottom left corner, and then, in the first column, click on the Create Account button, which will open the Account setup page.
Chances are that you will see the Google Analytics home page. I thought it was best to share both scenarios so that everyone can follow along with the tutorial.
This step consists of three parts: account setup, property setup, and information about your business.
Account Setup
The first thing you need to do is give your account a name. Let’s begin by understanding the term “account name.” This is the first field you will see when creating your account. Consider this a container for your properties (I’ll explain what properties are in the second part of this step) and tracking codes. You can create as many properties and tracking codes for individual sites using one account, or you can create separate accounts. This choice is entirely up to you.
The name of the account can be anything. It could be your business name or the name of your blog site. It is best practice to write a meaningful name so that it is easily recognizable.
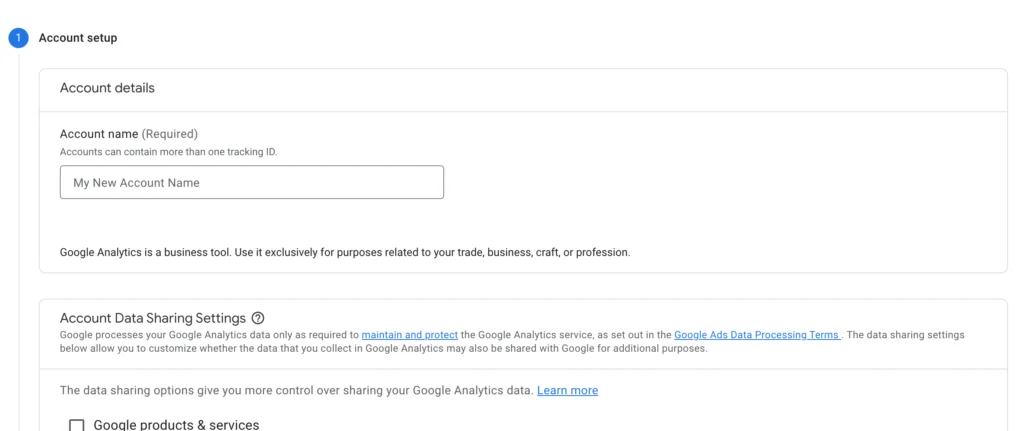
The name that I am going to give is Web Prep Educator.
After deciding what name you are going to write, you need to select what data you are willing to share with Google. The section shows that there are four data sharing options available. Go through them, read them, understand them, and decide which data sharing settings you want to allow.
I always go with the default selections, which are:
- Modeling contributions & business insights
- Technical support
- Account specialists
Click on the next button when you are ready to proceed.
Property Setup
So, what are properties in Google Analytics?
A property is a website, a web application, a mobile application, a blog, or anything else that Google can use to link to a unique tracking ID.
So, for example, if you want to track information for a company website or a personal blog, that will be the property, and a unique tracking code will be created for this property. In this way, Google will be able to fetch data and present the report using the tracking code for that property.
You can write whatever name you want, but for simplicity, it is best to write the actual name. I am going to write Web Prep Educator, as it will be easy for me to remember.
The next step is to set the time zone for your Google Analytics property. This is essential because the data that Google will collect will depend on the time zone you choose.
Business information
The last step to creating your Google Analytics is setting the business information. Select the type of industry and the size of your business, and then select the options you intend to use with Google Analytics for your business.
This part is optional; you can skip it if you prefer not to give this information right away.
Once done, click on create and this will open the Google Analytics Terms of Service Agreement popup. Over here, accept the terms and conditions in order to proceed.
The next step is to create the data stream and start collecting data for your property (website, blog, application, etc.).
Step 3: Add a data stream
On the data streams page, you need to specify the platform where the data you want to track will be coming from. Will it be a website or an app?
Since I want to track the activity of my website, I will choose Web as the platform and setup the data stream. I will enter the website URL and give my stream a name.
Another thing to be certain of is the “Enhance Measurement” option which should be on. This will measure how people interact with and use your sites automatically.
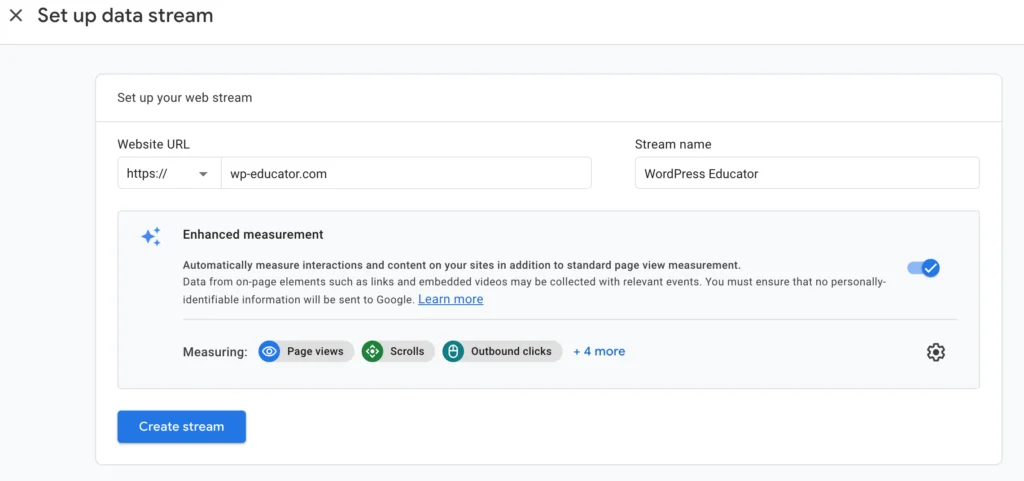
Once done, click on Create Stream. Congratulations! Your Google Analytics account has been created.
How to add a Google Analytics Tracking Code to a Website?
Step one is complete, which is creating the account. The second step involves creating a tracking code and adding it to your website.
After making the stream, you will be taken to the Installation Instructions page, which will tell you how to add the tracking code both automatically and manually.
How to install Google Analytics tracking code automatically?
The automatic method will scan your website and suggest plugins for your tracking code. With WordPress, you would get two options:
- Monster Insights
- SiteKit
You can select any one of the two, and it will load the installation instructions. Follow the instructions to install and activate the plugin. Then complete the setup wizard, and the Google Analytics code will be added to your website.
How to install Google Analytics tracking code manually?
The manual process involves copying the entire script tag and pasting it in the <head> section of your website. There are three ways you can add the tracking code manually:
- In the theme’s header.php file
- In the head section of your theme customization (depending on the theme installed)
- Using a header and footer plugin
Conclusion
It takes less than 30 minutes to set up a Google Analytics account and add the code to your website. I usually prefer the manual installation as it limits the use of a plugin and because the automatic method doesn’t feel very automated.