Launching a blog is easy, but maintaining it is a different story. WordPress is one of the easiest ways to establish a blog site quickly. Why? Well, because there are numerous free WordPress themes, plugins, and page builders. These free resources will help you to start a successful WordPress blog with zero experience. You don’t need to hire a developer or a web development agency.
However, this doesn’t guarantee you can set up a site in a single day. What this means is that the website development process is simple. It may take days or even months for you to launch your first WordPress site.
There is no need to be disheartened. I am an experienced developer, and it took me DAYS to launch my first blog.
However, the overall procedure is straightforward, and in this tutorial, I will explain how to start a blog for beginners step-by-step.
Why Is WordPress the Best?
I am exaggerating. WordPress isn’t the king of blogging. I would like to think it is.
Before explaining how to start a successful blog, it is crucial to understand why is WordPress the best choice.
Before beginning my blog, I researched “platform for blogging.” Yes, I typed in this query and I found plenty of blogging options:
- Medium
- Blogger
- Squarespace
- Weebly
- Webflow
- WordPress
Medium for Blogging
It is a great platform to publish your stories. Yes, stories! Medium uses the word “Stories” instead of blog or post. By publishing your story on Medium, you can share it with your followers and your global audience.
Many bloggers are earning from Medium, but it isn’t for me.
6 reasons why I don’t use Medium for blogging
- I don’t have any control over the platform except for publishing, editing, and deleting stories. Having limited authority bugged me a lot. Medium can do whatever it wants. If it shuts down, I will lose all of my hard work. I would need to start blogging from scratch.
- Having my own site gives me complete control and authority over it. I can do whatever I want. I can download my site locally and manually backup the WordPress site as needed.
- According to my research, Medium stories barely appear in searches. It is crucial to have tons of followers, claps, and readers for Medium to consider promoting your story to the public.
- It can be inadequate for SEO. I only saw a few Medium stories appearing in the top 3 pages of Google. I also realized there is no way for me to work on SEO. Apart from keyword research, there aren’t any helpful tools to analyze my content for SEO purposes.
- Medium is not a platform where you can rely on generating backlinks. I wrote on Medium and added a link to my blog. I later found that Medium has a “nofollow” rule for links. What this means is that it is telling search engines to ignore links. Therefore, adding links will not have any impact on search engine rankings.
- The Medium partner program allows writers to earn money. However, it is available in selected countries. Unfortunately, my country is not on the list. So, no matter how many followers and readers I have, I won’t be able to earn even a single cent.
Blogger for Blogging
Blogger is a famous platform. I discovered numerous bloggers using this to write and promote their content. Being entirely free (domain and hosting), I placed Blogger on the pedestal of my blogging platform lists. However, after playing around for less than 5 minutes, I quickly realized it wasn’t the one.
4 reasons why I don’t use Blogger for blogging
- It offers free hosting, but the catch is it comes with a Blogspot subdomain. So, my blog website appeared like www.myblog.blogspot.com
- It isn’t user-friendly at all. I felt I was designing a website like in the old days using HTML and CSS. There is no drag-and-drop feature or any page builder.
- I didn’t find any themes that I could use as a building block for my site design.
- It felt as if the purpose of Blogger was to write and publish content similar to Medium.
Squarespace for Blogging
I found Squarespace to be the best. It truly is a no-code website-building platform. After comparing Squarespace features with WordPress, I thought it was best not to go with this as a blogging platform.
- It is expensive. I can download WordPress for free and host it on Hostinger’s dedicated WordPress blog hosting.
- Hostinger is one of the best hosting for WordPress blogs due to its WordPress-dedicated hosting plans.
- It doesn’t offer a range of features when I compared it to WordPress. With WordPress, I can use free plugins to make my blogs better.
Weebly for Blogging
I didn’t dive too deep into Weebly. I believed it would be similar to the other blogging platforms. However, a glance at its features caught me by surprise.
To me, it seems as if Weebly is a powerful page builder because they cater to a large target audience. Weebly doesn’t only focus on building a blog website. It is also possible to create a well-functioning eCommerce website.
Regardless of the benefits, certain blog limitations compelled me to look the other way.
2 reasons why I don’t use Weebly for blogging
- Weebly doesn’t offer enough blog layout options and designs. I wanted my blog page to be user-friendly. Therefore, creating a website with Weebly only to discover that I don’t have limited control is a big red flag.
- A blog listing shows 10 posts per page, which is less. This approach is an outdated design. It would be difficult for a website to stand out.
Webflow for Blogging
Webflow is a well-developed website builder with a powerful interface. It offers free and premium plans. Unfortunately, the free version has restrictions, and it feels like they are forcing us to go with the paid options.
I know every company does it. They aim to make money, but it feels like a trap. So, before making a final decision, I gave the free trial a go.
3 reasons why I don’t use Webflow for blogging
- Webflow offers backup, but I could not create a backup of my demo site. There is no backup button. The only way to create a manual backup is by pressing Cmd+Shift+S on Mac or Ctrl+Shift+S on Windows. I followed the commands, but the backup process did not begin.
- The drag-and-drop interface is powerful but not user-friendly. I am an experienced web developer, but I could not understand how to edit the main navigation. It felt like I had to relearn website development.
- Overall, Webflow felt slow. It takes a while to load the page and its elements. If its admin panel is slow, I wonder how the site will function when it goes live.
WordPress for Blogging
After going through most of them, I decided to go with WordPress. I find it much easier to use due to the various free plugins to enhance the overall blogging functionality of my website. A couple of plugins I find helpful are:
- Scheduling posts for better engagement.
- Organizing WordPress pages in a tree-view structure for managing large websites.
If you are still unconvinced, here are some stats and fascinating facts about WordPress you probably did not know.
- 64.1% of the CMS market share is under the control of WordPress.
- More than 90% of bloggers opt to use WordPress.
- It is available in almost every language.
- 60,000 free plugins that are regularly updated can increase the site’s functionality in ways you could not imagine.
- 30% of the top sites use WordPress.
The 9-Step Guide to a Successful WordPress Blog
Before we begin, I want to point out that I will not explain how to make money or write content. These are entirely different topics.
I will teach you step-by-step how to start a blog using free plugins and a 2023 WordPress theme. I have hand-picked them because I believe they are the starting point for any successful WordPress blog.
So, if you are ready, roll up your sleeves because now you will learn how to create your own WordPress site.
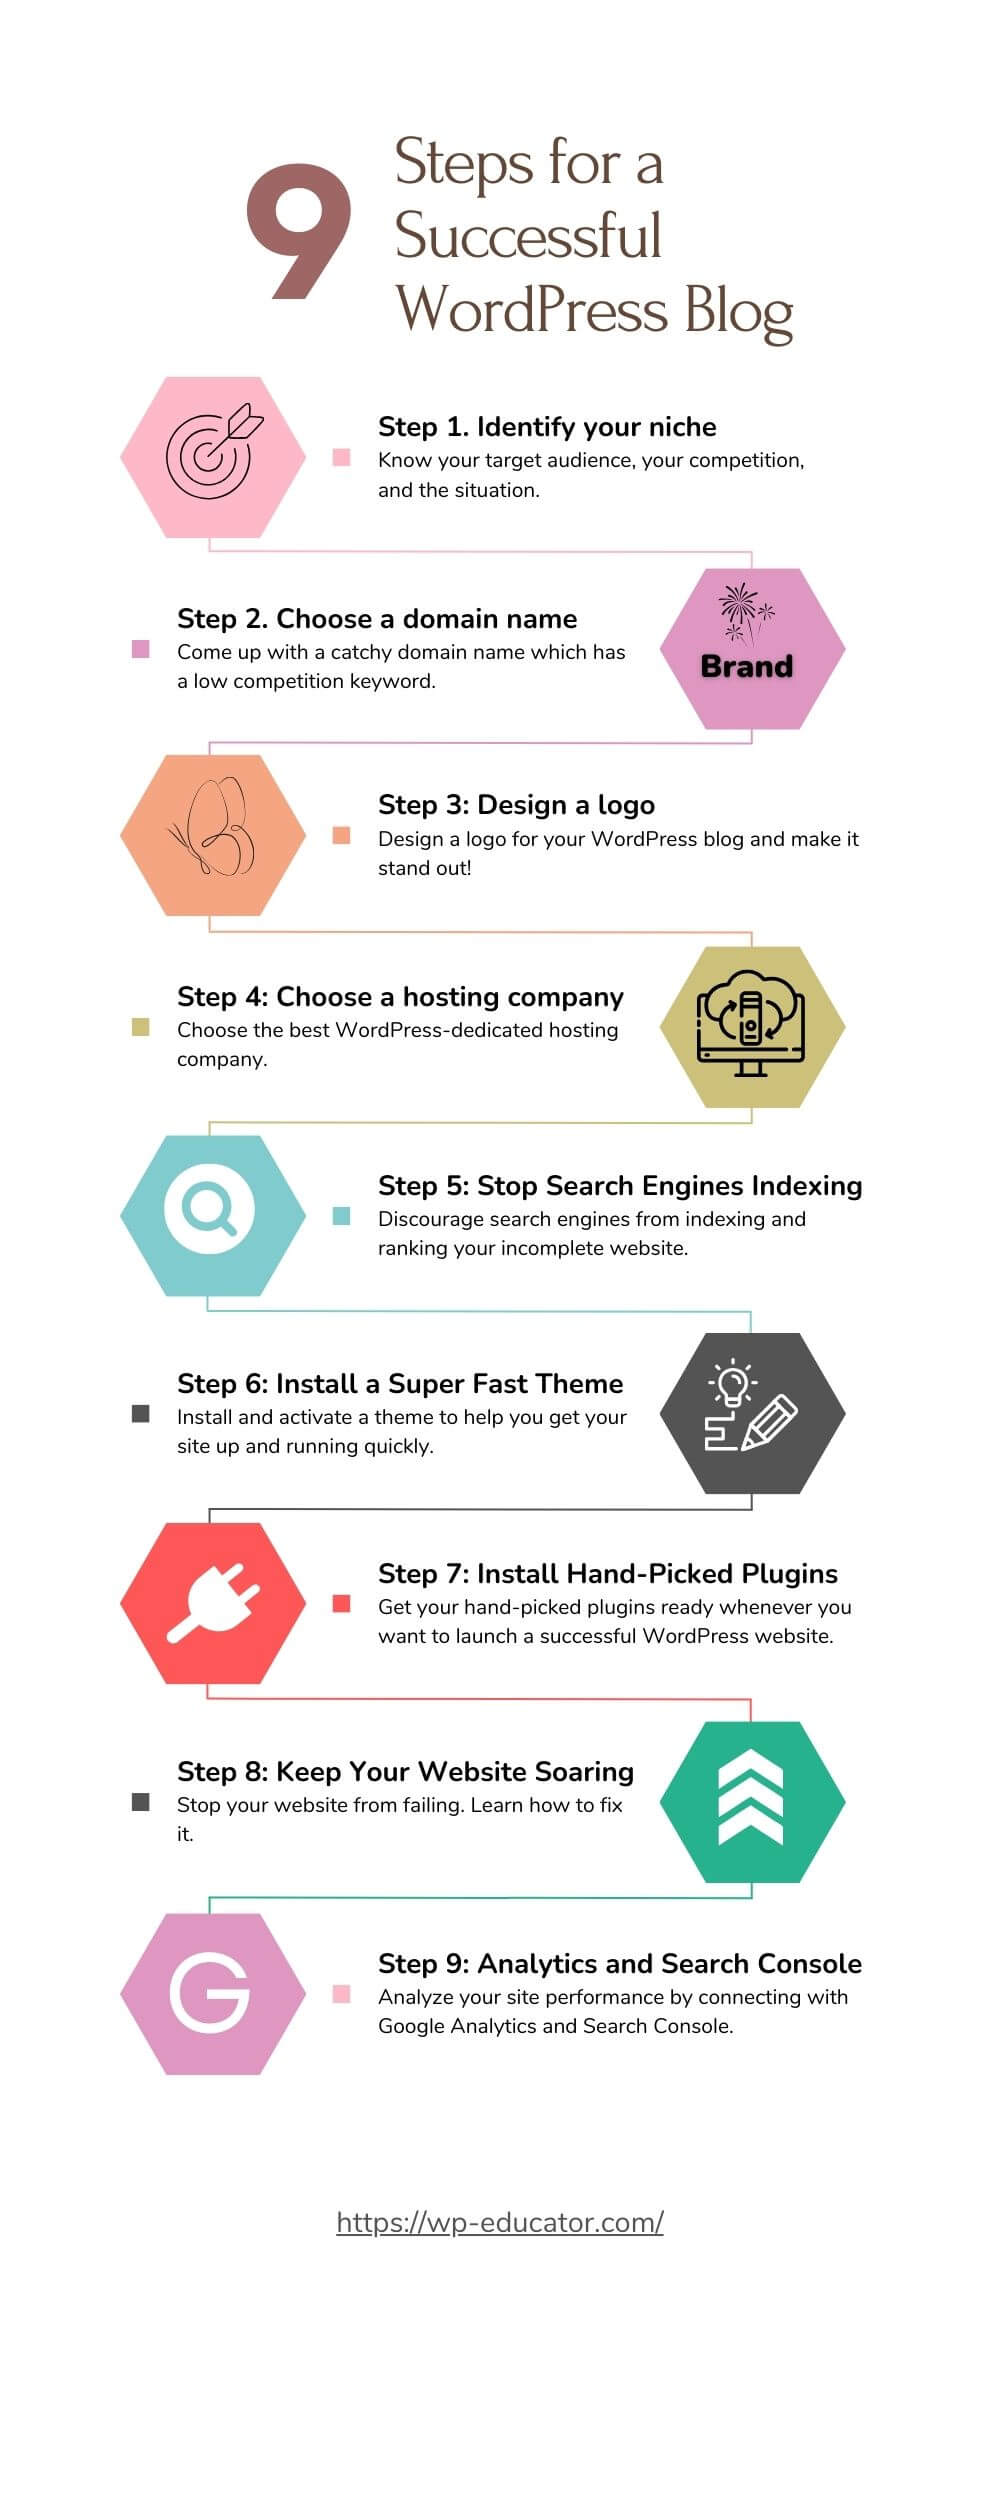
Step 1: Choose Your Blog Niche
Before starting a blog, you need to know what to write about.
Niche may seem a technical term, but it isn’t. When I started blogging, I kept hearing, well actually, reading the word “niche.” It felt like the rocket science of blogging because I didn’t understand it.
I am going to do my best to explain it to you, and don’t worry, it is super easy to understand.
Niche means a market segment. In blogging, niche means writing about a particular topic or focusing on a subtopic. For example, let’s assume you are a gamer and want to write about games. The question is, what will be your niche?
- Do you want to write about online games?
- Is your focus on gaming consoles, software, hardware, and accessories?
- Do you want to share the latest gaming news?
- Do you want to showcase your gaming experience?
Your niche can be a specific subtopic, or you can write everything about gaming, covering multiple categories.
My niche is broad. I am not focusing on a particular subtopic. I want to educate people on how to design and develop professional websites. Along with that, I want to guide people about blogging.
So, you can say that my niche is about education, focusing on WordPress web development and blogging.
After identifying your niche, the next step is choosing a domain name.
If you are stuck on what to write, try to discover profitable blog niches using SEO tools.
Step 2: Choose a Free Domain Name
Now, the mistake many people make when choosing a domain name, myself included, is to go to a domain name finder tool.
When I first started, I believed the domain name finder to be the sole way to select a domain name. I was very wrong. When I could not find the name of my choice, I began typing random names, hoping to come up with something unique. Due to this unprofessional approach, I wasted approximately 5 days.
Learn From My Mistakes
3 Steps in Choosing a Domain Name
Here are 3 steps I recommend you follow when choosing a name for your blog.
- Google the keyword associated with your blog and list the top sites ranking for this keyword. For example, let’s assume your blog is about cooking. Therefore, “cooking recipes” or “recipes” would be the keyword. Type that in Google search and write the name of the first top 10 pages.
- Filter the list. Keep the names you like and delete the rest.
- Go to Namelix. It is an excellent name-generator site that provides a list of AI-generated names.
I wish I had known about this sooner. By dropping the unprofessional name-finding method and adopting this approach, I found a name in 1 day only.
Step 3: Design a Logo for Your Blog
Woah, wait! Why do I need to design a logo for my blog? What about finding the best hosting for a WordPress blog? Choosing the right domain name and reliable hosting are vital steps toward launching a WordPress site.
I bet this is what you were thinking. Don’t worry. You can create a successful WordPress blog following these steps.
The standard steps involve choosing a domain name, followed by a web hosting company. However, I am going with a different approach. You will find out in Step 3 why you should design a logo first.
If you are not a designer, don’t worry. You should and can effortlessly create a logo for your website, even if you don’t know the basics of designing. Yes, this is possible!
I am not a designer, but I skillfully created a professional logo for free using Canva. I hardly spent a few days designing my logo. Canva provided me with various free logos as a starting point:
- Pictorial
- Monogram
- Text-based
By browsing the free library, I came up with a design I liked by altering a logo. Along with creating my professional logo, I also learned how to create a favicon and add it to my website.
Step 4: Choose a Reliable Web Hosting Company
The fourth step is choosing a WordPress blog hosting company.
After choosing the domain name and creating a logo, it is time to select the best hosting for the WordPress blog. We want one that offers a one-year free domain name.
Let me help you save some time. Head over to Hostinger and select one of their WordPress-dedicated hosting plans. They offer numerous features at a reasonable price. Once you choose a plan and pay for it, Hostinger will redirect you to the Hpanel.
From there, you can set up your WordPress site. The best thing about using Hostinger is that it will install WordPress for you. They will provide step-by-step instructions, and your site will get up and running instantly. It is a real time saver. You don’t have to create your own WordPress site from scratch. You only need to focus on how to make your blog popular.
Now, do you understand why I said designing a logo is necessary? Hostinger will launch the WordPress site for you. Since your site will be live, it is best to have the logo beforehand.
I wasn’t aware that my blog would be live instantly for the whole world to see. I assumed it would be a dev site, which I would push to live once my site is complete. That is why creating a logo first is vital.
Step 5: Keep Your Site Private
You’re probably second-guessing my methods of creating a successful WordPress blog, but please bear with me. At this point, it is critical to stop search engines from indexing your site because it is in development.
Since your site is not ready, I don’t want your incomplete website to appear in Google search results. That is why I am stressing to keep it away from the public till the site is 100% ready.
There are four ways to stop search engines from crawling a WordPress website:
- Discourage search engines from indexing your site.
- Add the Disallow rule in the robots.txt file.
- Add a password to your entire site so no one can access it
- Add a no-index meta tag.
Once the site is ready, you can revert these changes.
3 Benefits of Creating a Coming Soon Landing Page
Another method you can adopt is by creating a coming soon landing page. You can also add a subscription form, encouraging people to subscribe. They will get a notification once the site goes live.
I like the second approach. I didn’t realize the benefits of creating a landing page. If I had, I would have gone with this.
- You don’t need to prevent search engines from crawling your site.
- If people land on your blog, there is a chance they may subscribe. So, you would have a list of future visitors ready. You can send out invites once the site goes live.
- You can create your blog social media pages where you can share content. It will inform and remind readers about your blog and help bring traffic to your website when it goes live.
Step 6: Create a Visually Appealing WordPress Blog
If you want to create a visually appealing successful WordPress blog but have zero design skills, I would recommend installing a free theme. Installing and activating a theme would help you get your site up and running quickly.
This is what I did. You can search for the best WordPress themes for blogs, or you can follow along with me.
I saved development and designing days by installing and activating the Astra theme. Within a few clicks, my site was ready to deploy.
Astra theme stats:
- Since: 2017
- Downloads: 2+ million
- Rating: 5 out of 5 stars
- Best suited for: Fast performance, pre-built templates
- Price: freemium
According to statistics, Astra is the 2nd most popular WordPress theme, capable of building blogs and personal and professional websites. It is easy to use and customize. The best feature I like about it is the header and footer drag-and-drop builder. I can create complex header and footer designs within the theme instead of downloading additional plugins or writing code.
Moreover, I found out that Astra provides the ability to create custom templates. These templates are helpful if you want to create a unique design for a page. However, I haven’t found much use for it, as editing the page directly and using the WordPress widgets gets the job done.
In the most recent update, Astra has provided Spectra. It is a page builder and works in collaboration with the Gutenberg editor.
Spectra offers the most commonly used add-ons, such as search bar, accordion, container, timeline, counter, etc. It is exceptionally lightweight in comparison to other popular page builders.
6 Reasons Why I Use Astra
- It is a popular and reliable free theme.
- It offers a lot of customization and comes with a header and footer builder.
- It provides a beautiful design on installation, so you don’t have to struggle with creating a site layout from scratch.
- It is mobile-friendly.
- It is fast, lightweight, and loads the site within 0.5 seconds. So you don’t have to worry about your site slowing down.
- With Spectra, I don’t have to download page builders or additional plugins to enhance the functionality of the page builder.
Astra is my hand-picked go-to theme whenever I launch a WordPress site, whether for myself or a client. I never had to pay for it. I always use the free version.
Don’t forget to create a WordPress child theme!
Step 7: 4 Hand-Picked Plugins to Supercharge Your Successful WordPress Blog
Here are some hand-picked plugins I download whenever I launch a WordPress site.
Yoast SEO
Stats:
- Since: 2008
- Downloads: 5+ million
- Rating: 4.8 out of 5 stars
- Best suited for: SEO, Website Ranking, XML Sitemap, and Robots.txt file creation
- Price: freemium
Yoast SEO is the best WP SEO plugin for managing your site content. It provides basic SEO options, such as adding metadata and meta description to the pages and posts.
Apart from that, the plugin also allows the option to create a robots.txt file. Any changes you make to the robots.txt file in the Yoast SEO settings will automatically update the robots.txt file located on the server.
The plugin provides the ability to write meta information and calculates an SEO score of the page or post. The provided suggestions will help improve:
- Content Readability
- SEO Score
- Increase Searchability
If you edit your post in the default WordPress editor Gutenberg in the top right corner, you will see two options:
- Headline Analyzer
- Post SEO
Both of them will show a score out of 100. Your job is to try and get at 70+.
The headline analyzer will show you how to improve your post heading to make it more attractive to the reader. You can add another heading and compare a score with the current one.
With the SEO score, you can see what your post is missing and implement those fixes to rank higher. It usually involves adding the focus keywords, images, links, and basic SEO such as meta tags and readability.
I try to aim for the green light, but it is not always possible to get a 100% score. Also, a high score doesn’t mean your site will rank on the 1st page of Google. It only indicates that you have successfully done your on-page SEO.
3 Reasons Why I Use Yoast SEO
- It helps identify what needs to be improved.
- Changes to robots.txt can be made directly in the editor instead of logging into the server and editing the file from there.
- It provides a great insight into the fundamentals of blogging SEO.
Nitropack
Stats:
- Since: 2018
- Downloads: 1+ million
- Rating: 4.3 out of 5 stars
- Best suited for: Speed Optimization
- Price: freemium
Nitropack is an awesome tool to speed up your website performance. Nitropack optimizes everything on your site, such as images, videos, files, CDN, etc.
Even though the Astra theme is lightweight, your site may have numerous images, videos, and extra plugins. All of which may be important but need to be optimized. With a single click, the optimization technique applied by Nitropack ensures that the site loads fast every day.
2 Reasons Why I Use NitroPack
- It optimizes everything in a single click.
- It improves the site performance score for desktop and mobile when tested on Google page speed insights.
All-in-One WP Migration
Stats:
- Since: 2013
- Downloads: 5+ million
- Rating: 4.5 out of 5 stars
- Best suited for: Creating backups
- Price: freemium
If you don’t know how to take backups from the server or if it is complicated, install All-in-One WP migration. I can take backups from the server directly, but I choose to use this migration plugin.
3 reasons why I use All-in-One WP migration
- I can take backups in a single click.
- Backups are available on the plugin dashboard page. If I need to load a previous copy, I can do it by clicking the restore button.
- I can also download the zip files for safekeeping.
WordFence
Stats:
- Since: 2012
- Downloads: 4+ million
- Rating: 4.7 out of 5 stars
- Best suited for: Two-factor authentication
- Price: freemium
WordFence has numerous features, but I mainly use it for Two-factor authentication.
The Two-factor authentication is an extra login after you log in. What I mean is when you log in to your WordPress admin panel, you will get another login field. Over here, you need to enter the six-digit code to access your WordPress admin panel. If you fail to provide one, you will be unable to proceed.
5 reasons why I use WordFence
- This extra level of security is an excellent way to discourage hackers from accessing your WordPress blog.
- The code can be accessed using the Authly desktop app or the Google Authenticator app on my cell phone.
- The code refreshes after approximately 20 seconds.
- There is no need to connect to the internet to get the codes.
- It protects against brute force attacks by limiting login attempts.
Step 8: Keep Your Successful WordPress Blog Soaring and Never Let It Crash
After installing themes and plugins, your site is 50% complete. Now, you need to work on the remaining 50% to ensure your site is totally ready.
This 50% is the most essential part. If you don’t focus on it, your site will fail.
According to statistics, 90% of websites fail within the first three months, whether it’s an eCommerce store, a blog, or an informative website.
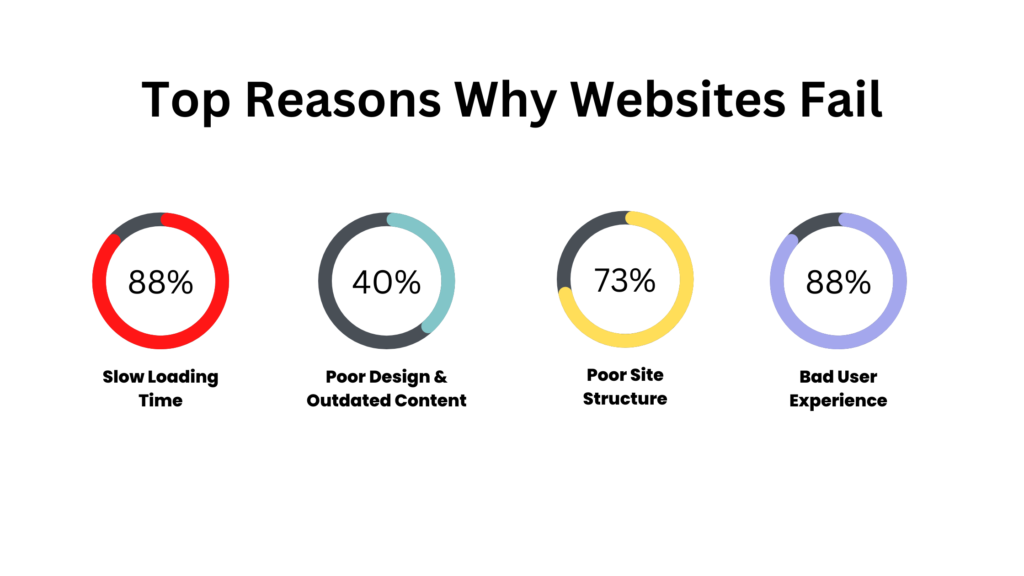
There are numerous reasons why this happens. According to various studies:
- 88% of websites fail because of slow loading time.
- 40% of existing customers leave because of poor design and outdated content.
- 73% of websites fail because it is not mobile-friendly.
- 88% of customers don’t return because of a bad experience.
All of this may feel daunting to fix, but in reality, there are only three things you need to manage for a website to be successful.
- Speed
- Design
- Content
To make a successful WordPress blog, you must install a reliable theme and the best plugins. That is why I shared the hand-picked theme and plugins. These are my go-to whenever I launch a WordPress site.
Did you notice I did not include any page builder in the list of plugins? It is because I encourage you to use the WordPress Gutenberg editor paired with Spectra. This Astra theme page builder works with the default WordPress editor.
Spectra does not require external code and loads fewer external scripts and file dependencies. This makes it a super-fast editor, increasing your site load time.
After switching from page builders to Spectra, I have noticed a substantial increase in my blog loading time.
How Long Do Users Spend on a Site?
Users spend an average of 5 seconds on your website to determine if it’s worth browsing time.
If you are a blogger, you have probably heard the saying:
"Hook your readers!"
It means to make the introduction of your blog post engaging. Readers should want to go through the whole article.
In web development, this 5-second period is your fish hook to reel in customers.
So your website should load within a few milliseconds to a maximum of 2 seconds, not more. It is what customers expect. Otherwise, they will leave.
Why Is Web Design Important to a User?
To make your successful WordPress blog popular, focus on your site performance.
The design should be catchy. According to research, it takes approximately 3 seconds for your customers’ eyes to land on an impressive design. If the site layout is easy to navigate, the longer the user will interact with your site and visit it frequently.
Here is a trick I implement to ensure my website design is good. I look at the competitor sites, especially those that attract me the most. I study what makes me stay on their site.
- Is it the font?
- Is it the navigation?
- Is it the design?
- Is it the eye-catching infographics?
After creating a list of what I like, I return to my blog to see what I am missing and update it accordingly.
Ensuring your website design looks modern and works lightning-fast is a never-ending process. I updated the WP Educator design twice. I am frequently looking at ways to load it even faster.
Step 9: Connect to Google Analytics and Google Search Console
Congratulations! You are on your way to publish your blog. In fact, make it live already! Connecting to Google Analytics and Google Search Console does not require your website to be 100% ready.
Google Analytics helps you analyze how many users are interacting with your website.
Google Search Console monitors your website performance, identifies issues, and analyzes your site’s presence in Google search results.
You first need to create a Google Analytics account. You will get a tracking code that you need to include in the head tag of your blog. After that, you can then set up Google Search Console. It will link to your blog by connecting with the Google Analytics code.
How Much Money Do I Need To Start a Blog on WordPress?
After deciding to go with WordPress and be a part of the 90% of bloggers, the next question that came to my mind was:
"How Much Money Do I Need To Start a Success WordPress Blog."
Domain Name and Web Hosting Cost
Different hosting companies offer different rates. Some even offer a free domain for a year if you purchase hosting from them. Here is a list of the top companies and the domain name cost.
- Hostinger WordPress Hosting: Free domain with web hosting costs $29.88 for a 12-month plan.
- Dreamhost WordPress Hosting: Free domain with web hosting costs $58.39 for a 12-month plan.
- Bluehost WordPress Hosting: Free domain with web hosting costs $135.24 for a 12-month plan.
It is also necessary to be aware of the hidden costs. These hidden costs are in the form of extra services, for example, SSL certificates, eCommerce setup, premium SEO services, etc.
Also, another thing to be mindful of is the domain name. It is free for only ONE YEAR. When I was renewing my blog yearly subscription, I noticed a substantial increase in the annual fee.
The domain name and web hosting = average $100
** Keeping in mind the price of the domain name when renewing.
I went with Hostinger because it is ideal for beginners who want to start a WordPress website. The WordPress Hosting plans and the payment process is simple. I could easily understand what I was getting and how much I was paying.
Website Designing and Development Cost
You don’t need to worry about website design and development costs. With this comprehensive guide, you can do it yourself. It doesn’t matter if you have zero experience.
So, don’t waste your time and money by hiring an agency or freelancer. If you still want to hire them, keep a minimum of $3000 aside.
Conclusion
By following these 9 steps, you can create a successful WordPress blog. Installing the Astra theme and these hand-picked plugins is more than enough. Why? Because they provide everything that you need. Think of this as a complete package for blogging.
I am an experienced web developer, and I follow these steps when I launch a WordPress site.
If you believe there are more plugins or additional steps, share your ideas in the comments below.
I discovered your site on bing and check a couple of your early posts. Always maintain the great operate. I just extra increase RSS feed to my MSN News Reader. Looking for forward to reading much more on your part down the road!…