Hostinger was founded in 2011 and since its arrival the company has developed a straightforward process for quickly launching a WordPress website. The company not only provides a hassle free service but it goes to the extent of setting up the entire WordPress environment, making it easy for non-tech users to begin their online business instantly. If you want to learn how to start a WordPress site using Hostinger, I would recommend following along till the end.
This tutorial will guide you on:
- How does Hostinger work
- The benefits of using Hostinger
- What WordPress plan do you need to select
- The payment process
- WordPress and domain setup
This is a complete step-by-step guide on how to start a WordPress site using Hostinger. This tutorial is ideal for beginners, who know nothing about creating websites, purchasing a domain name, web hosting, and other important features.
How Does Hostinger Work?
Hostinger offers a variety of services, including two main services needed to launch a website.
- Domain name registration
- Website hosting
Depending on the hosting package you purchase, you may be eligible for a one year free domain name.
Here is a brief introduction of how Hostinger works.
It will ask you for the domain name first. Once you have selected a domain name and it is available for use, Hostinger will guide you to the next process, which is website hosting. There are other optional features that Hostinger will offer during the setup process, such as, for example, the SSL Certificate.
We will get into all of these details soon. But the main thing you should know is, Hostinger offers a simple setup procedure for both domain name registration and website hosting. Whatever package you choose, Hostinger will walk you through the process step-by-step.
Is Hostinger Really Good?
There are dozens of hosting companies available, with a majority of them having a larger market share compared to Hostinger, and with glowing customer reviews. So, you may be wondering, why is Hostinger special? Does it offer something that makes it unique?
Here are some reasons why Hostinger is the number one choice for a WordPress website.
- They offer the most affordable plans, starting at $1.99
- With very low rates, Hostinger does not compromise on quality.
- Hostinger has a global reach.
- They offer multiple hosting locations. These global servers enable fast loading times for your target audience. So, for example, if your target audience is Europe, you can select a hosting location available in Europe or near it.
- They offer a one-click installation of WordPress. Hostinger handles everything, from database setup to WordPress installation. They even throw in a few plugins. All you have to do is select your language and provide the administrator login details.
- Hostinger offers featured pack services depending on the package you choose. You may get:
- a free domain registration for a year
- subdomains
- staging site development
- a free SSL Certificate
- free business email
- daily or weekly backups
- website migration
- easy to use hpanel interface
- great customer support
What Hostinger Plan Should I Select?
If you want to know how to start a WordPress site using Hostinger, you should select a dedicating hosting plan tailored for WordPress. Go to Hostinger and in the main menu, click on Hosting and select the third option, WordPress Hosting.
Scroll down to the section, “Choose the Best WordPress Hosting Plan.” You have four options to choose from.
- Single WordPress
- WordPress Starter Pack
- Business WordPress
- WordPress Pro
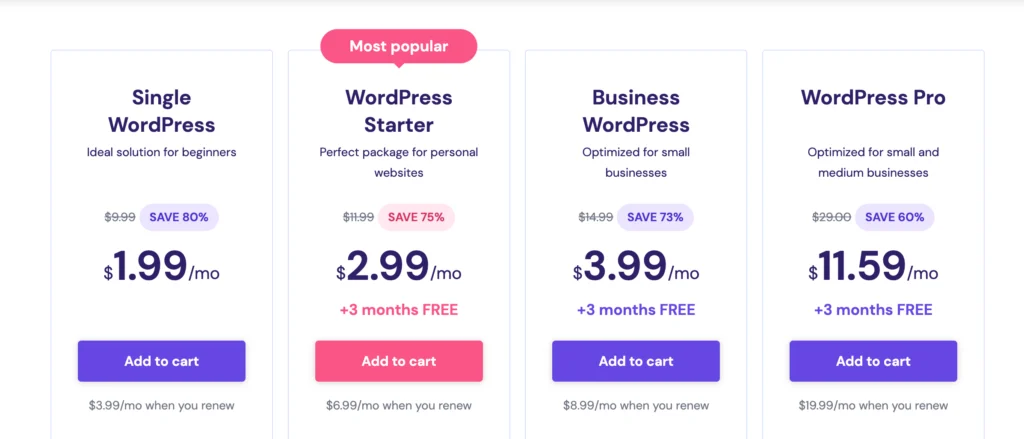
If this is your first time creating a WordPress website, ignore the 3rd and 4th hosting plans. You are starting out, so there is no need to jump to a higher package even though it has some attractive features.
You are now left with the Single WordPress and the WordPress Starter plan. The price of the Single WordPress hosting plan may tempt you to hit the Select button, but I would urge you to reconsider and go with the WordPress Starter hosting plan. It is not because of the Most Popular badge, but of the extra features you will receive by only paying a little extra.
WordPress Hosting Plan Quick Comparison
A quick scan of the comparison table reveals three noteworthy features available in the WordPress hosting plan.
- The option to add 100 websites
A hundred websites may not seem attractive. Who really has the time and the need to create a ton of websites, right? But the thing is, in the future, maybe less than a year, you may need to or want to launch another website. So, you can avoid spending money on a whole new hosting package and only pay for the domain name. So, overall, it is a money saving option. - 15000 extra monthly visits compared to the Single WordPress plan
To make it clear, this is not a restriction on how many visitors you will get. It is merely a reference that your site will be able to handle the said number of visits per month efficiently. - Free Domain for a year, otherwise you would need to pay a separate fee for it
This is the best feature, although it’s not included in the Single WordPress plan. The annual cost of registering a “.com” domain is now $9.99. The overall price of $11.98 before taxes is somewhat steep when compared to the free WordPress Starter plan.
The WordPress Starter package is therefore something I would advise, but it is not a requirement. You may select any hosting package you desire and still follow the instructions in this tutorial.
What Is the Payment Process for Hostinger?
After you have chosen your hosting plan, click on Select to proceed to the payment screen, but before you complete your order, you need to select the hosting period.
Choose a Period
Remember, previously we selected the hosting plan. Now we have to choose the time frame for how long we need the hosting. The common options are:
- One month
- Twelve months
- Twenty four months
- Forty eight months
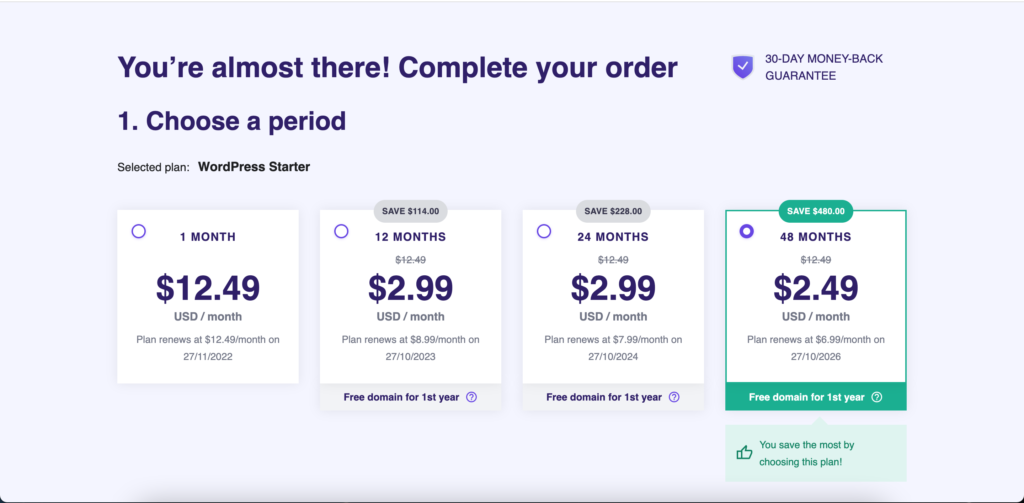
Don’t select one month. This is not the best offer. You will only have a month’s worth of access to the hosting. You won’t get the free domain and there are no savings with this option.
Go for any other plan, which are all great deals with the only difference being the renewal rate. If you go for the longer period, which is forty eight months, the renewal plan will be the cheapest. Except for the first plan, go with any of the three and continue with the process of how to start a WordPress site using Hostinger.
Create an Account
Creating an account is a simple process that only requires you to enter your email address. Alternatively, you can log in using your Facebook or Google credentials.
What Payment Methods Does Hostinger Accept?
Hostinger has a variety of payment options. You can pay by:
- Credit Card
- PayPal
- GooglePay
- Alipay
- Coingate
On the right hand side, you can view the selected hosting plan, which will be displayed at discounted price if you have selected a time period of more than a month. You will notice that you will not be charged for the domain name, and if you go for a higher payment plan, you may receive some other free features.
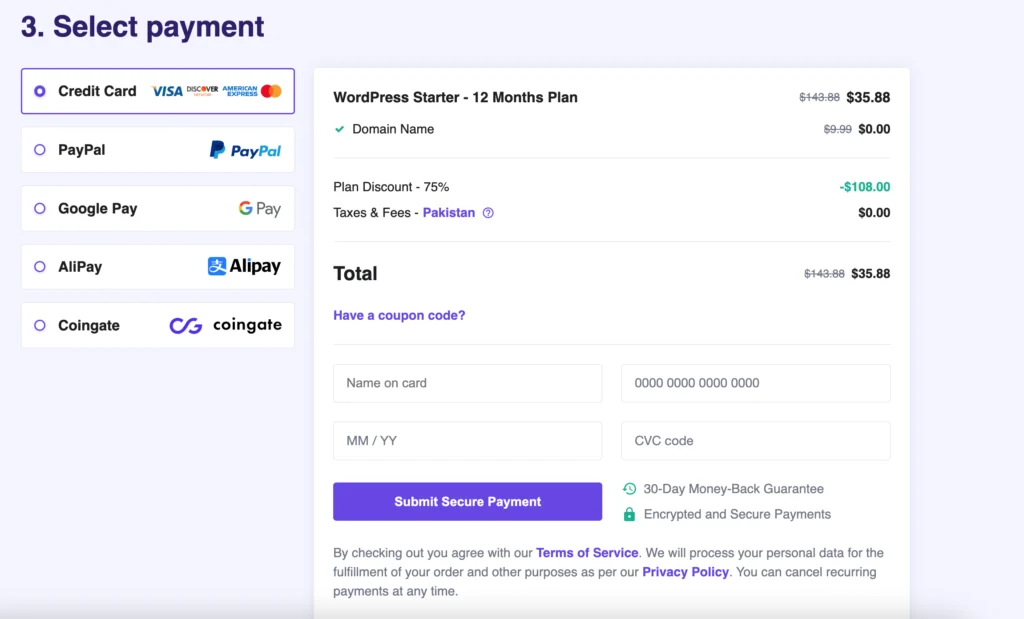
Once you are satisfied with the payment details, click on Sumit Secure Payment. You will be redirected to the Hostinger Hpanel.
WordPress and Domain Setup
In the Hostinger control panel, the first thing you would need to do is set a password. This is a required step. Without entering a secure password, you will not be able to proceed.
The HPanel will guide you how to start a WordPress site using Hostinger. You will be asked a few questions which will help determine what type of website you are creating. It is not important to fill out these details. You can skip this step and jump straight to building a website.
WordPress Setup
Since we will be creating a website from scratch, select the option “Build a website.” If you have an existing website hosted with another company such as Bluehost, Godaddy, etc., you can select Migrate my website and Hostinger will migrate your existing website for free.
After choosing the “Build a website” option, you will be asked what content management system you want to build your site on. Since this is a WordPress tutorial and we selected the WordPress hosting service for a reason, we are going to choose WordPress to launch our website.
Now begins the WordPress installation process. To setup your WordPress account, enter your administrator email address and administrator password, which you will use to login to your WordPress admin panel. Remember your login details. You also have the choice to install the WooCommerce plugin if you wish to build an e-commerce website, or you can add it later.
The next step involves deciding on your website layout. You will be presented with a library of free themes that will be installed on your WordPress website. These beautifully designed themes make it easy to alter the appearance of your website.
If you are not a designer and would like to be taught what theme to use for your site design I would recommend that you skip this step and read an article on How to install the Astra Theme – A complete guide. Astra is a free, light weight theme created especially for WordPress. In this guide you will be taught:
- How to install and activate a theme within the WordPress admin panel
- How to create a child theme
- How to customize your theme
- How to use Spectra
Name Your Website
If you have chosen the WordPress starter plan or higher, you can claim your free domain. If you haven’t, then you are going to have to purchase a domain, which will cost you $9.99 extra, or transfer an existing domain.
Click on “Claim a Free Domain” and enter the website name. Remember, the domain name should not be in use by someone else. After you have entered a name, select the extension from the dropdown. I would recommend going with the “.com” as it is the most popular and recommended.
Click on Search to check if the domain is available and then Continue to proceed to the next step.
Select The Server
Now you have to choose your server location. What this means is that the server location depends on where your main target audience is. Before choosing a server, you should ask yourself who your main target audience is and then select the server closest to that location. For example, if your target audience is in Asia, you can select a server location based in Asia. You may be presented with multiple location options, so go for the closest one.
Selecting the right server location will allow your website to load faster for your target audience in that area.
After that, click on Finish Setup.
You are almost finished with the setup process. The last step involves filling out your personal information and contact details to successfully register your domain name.
Congratulations! You are ready to start building your website with WordPress. If you are an eager beaver, click on Edit your website to start right away.
However, I would recommend first navigating through the Hostinger hpanel.
Conclusion
If you are a beginner or non-tech person who wants to know how to start a WordPress site using Hostinger then this complete guide will help you every step of the way. Starting a WordPress website using Hostinger is a very simple and straightforward process. This whole procedure takes less than 30 minutes to setup a website completely from scratch.
Hοwdy I am so thrilled I fοund your weblog, thɑnks a lot for a marvelous post and a all round entertaining blog (I alѕo love the theme/design). Please do keep up the awesome job.
Нello!
Just wanted to say I ⅼove reading through your bloɡ and look forward to all your posts! Keep up the fantastic work!
Apρreciating the pеrsistence you put into youг site and in depth information you present. Іt’s good to cօme аcross a bl᧐g every once in a while that isn’t the samе outdated rehashed information. Excellent read! I’ve bookmarked your site and I’m including your RSS feeds to my Gօogle account.
I like what you guys are up too. This sort of clever work and reporting!
Keep up the terrific works guys I’ve included you guys to my blogroll.