A backup not created is a website lost!
I created this rule for myself as a reminder to always create a backup of every website. Backup is an important part of website development, especially when it is time to update your website. You will definitely get updates on the WordPress core, plugins, and themes every week. Before proceeding, it is important to take a backup of the site. This tutorial is going to explain, step-by-step, how to take a backup of a site using Hostinger.
We will learn how to take a backup of a site using the Hostinger hPanel, and this will be a manual backup process. This manual backup is a very simple, one-click procedure. Hostinger has already provided a backup feature, which we will be utilizing to take a backup of the entire site, all files and database included.
This tutorial will also cover how to download the backup to your local computer and how to restore the backup with one-click or restore specific files and the database individually. The second way to restore a backup is handy if you don’t need to restore the entire site.
Why is it important to have a backup?
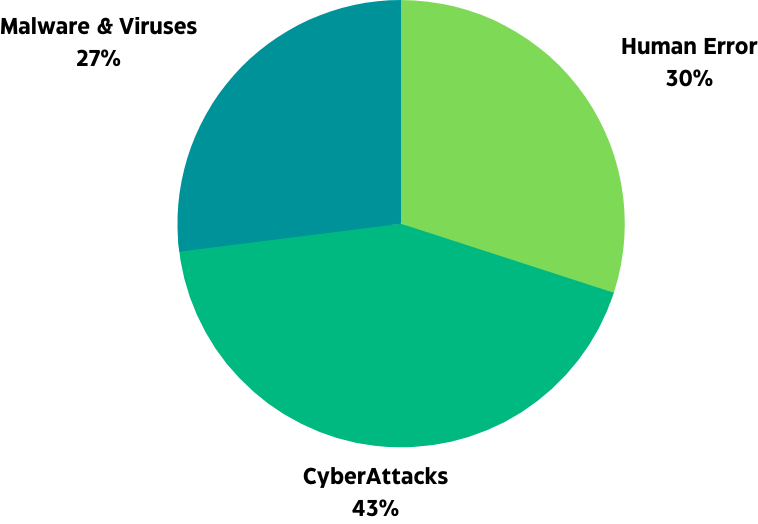
According to statistics:
- 29% of data loss is caused by human error.
- 43% of data loss is caused by cyberattacks.
- 27% of data loss is caused by software failure, malware, or viruses.
Not only is it helpful to have a backup when you’re making changes to your website, but it’s also important for security.
I never thought to make a backup of my site before updating it, and because of that, I ran into trouble when there was a conflict between plugins. This caused my site to crash. The front end was not loading, and neither was the backend. I started to panic and immediately Googled, hoping to find a solution. Unfortunately, there was no way to restore my site. However, there were some tricks and tips that turned out to be helpful in getting my site up and running, but not quite the way it was before.
The only way to solve the conflict was to disable the plugin from the server. I couldn’t deactivate it from the WordPress backend because that was also not working.
I had to log in to the server and navigate the site files and folders to look for the plugin that was causing the conflict. To disable it, I simply renamed it. After changing the name, the site worked properly, but I lost that plugin and its features due to the compatibility issue.
After this crisis, I understood why it was important to have a backup, and I always remember to create one before proceeding.
I usually take a backup using a plugin that does everything for me with one click. You can read more on How to Backup a WordPress Site Using the All-in-One WP Migration Plugin in this guide:
How to update WordPress, Plugins and Themes the proper way
However, this time I decided to try creating a backup using the Hostinger hPanel because this was something I believed I should know, and I wanted to share my experience.
Hostinger Backup Features
Hostinger has a lot of features that make it tempting to use it often to make backups of your site.
Here are some of the backup features that Hostinger offers:
- Automatic Backups: Depending on the plan you select, Hostinger provides automatic daily, weekly, or monthly backups of the data and content on your website. It takes a backup of all the site files and folders, including the database. The benefit of automatic backups is, you don’t need to worry about forgetting to take a backup, and if your site is hacked, you will have access to the latest backup.
- Manual Backups: You can create a manual backup of your website data and content anytime you want with just a few clicks, which I will demonstrate in the next section.
- One-Click Restore: Hostinger’s backup tool allows you to restore your complete website with a single click.
- Backup rotation: Another awesome feature of Hostinger is the backup rotation. This means that when new backups are made, the old backups are automatically deleted. This keeps your storage space from getting too full.
- Cloud Storage: Your backups are stored securely on Hostinger’s cloud servers.
- Download Backups: You can download your backup files to your local computer.
Overall, Hostinger’s backup has some really cool and user friendly features that everyone should avail themselves of. Another benefit of using Hostinger is, you don’t need to install third party plugins.
I prefer to limit the use of plugins on my site due to performance and security concerns.
Read:3 reasons how plugins can destroy your site.
How to Backup WordPress Site Manually Using Hostinger hPanel
Hostinger will grant you access to hPanel, a custom tool they created, when you purchase a plan. You can read more about it here to get an overview of what hPanel is and how it works.
Here is a step-by-step guide on how to take a backup using Hostinger.
Logging into your Hostinger account
Go to your Hostinger hPanel; you will get the details when you choose a hosting plan. If you somehow get the URL and don’t have a hosting plan, click on the link at the bottom which will redirect you to the various web hosting plans available on Hostinger.
Choosing the website
You may have more than one website, so you need to choose which site you need to take a backup of. To do that, click on the Website link in the main menu, which will represent a list of currently hosted websites.
Click on the Manage button for the site you want to create a backup of.

This will open up the dashboard related to that website, presenting multiple options and features.
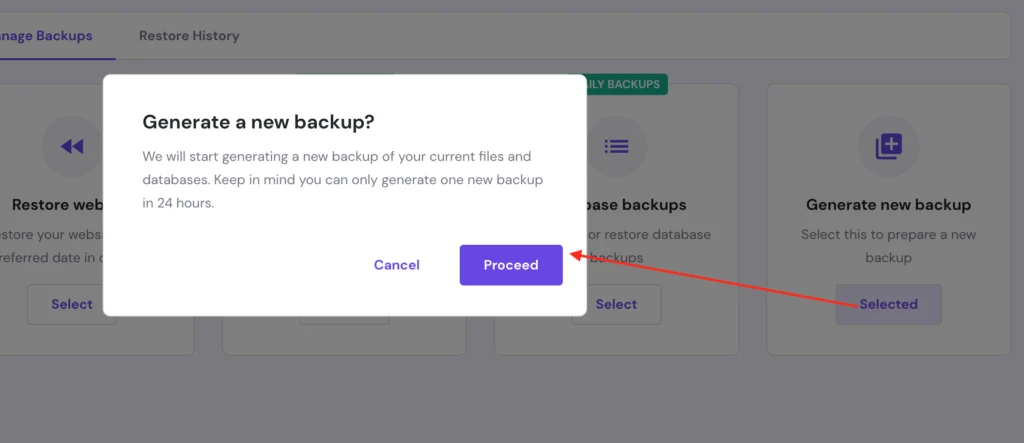
Starting the Backup Process
Click on the Daily Backups menu or navigate to Files > Backups. Both of these methods will take you to the backups page where you have the option to select Generate new backup. Selecting this option will open a popup confirming the process. It also comes with a notice.
Keep in mind you can only generate one new backup in 24 hours.
A new box will appear at the bottom showing the backup process. Unfortunately, it doesn’t show the percentage, and I would also recommend staying on the page to keep an eye on it, so you would know when the backup is complete. Even though it says it will take hours, it may take less than a minute, depending on the size of your site. One downside of this is that there is no success message when the backup is complete which leads to a lot of confusion. Luckily, there is a way to verify this.
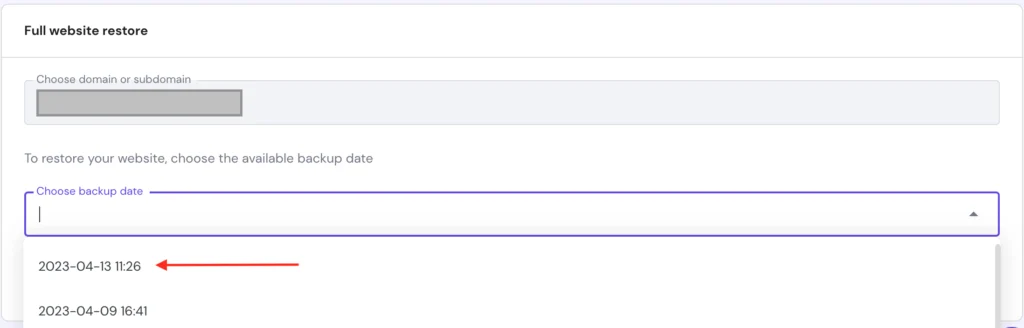
Select the restore website option, and in the dropdown field, choose the website date. This will show you the date and time of the created backup. The latest backup will be the one that you recently took, but confirm the date and time as well.
How to download a website backup from Hostinger hPanel?
It is easy to download the entire website backup and save it on your computer. However, there are two steps to follow:
- Download website file backups
- Download database backups
Download website file backups
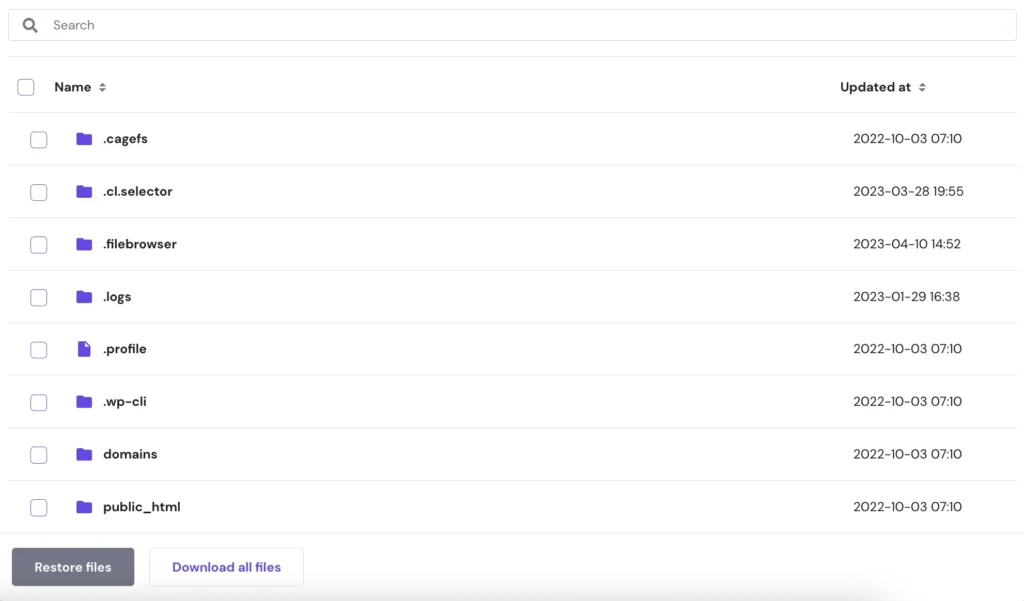
Click the Select button under Files backups and choose the date of the backup you want to download. Click the Next Step button, which will list the folders, subfolders, and files. From here, you can click on the individual folders or drill down to select a subfolder or specific file. This will enable the Restore Files button, a handy tool if you want to restore a particular file instead of the whole website. begin the download process for the files only.
To save a copy of the website files on your local computer, click on the Download All Files button. This will download the zip file to your computer.
Download database backups
The database backup process is similar to the operation described above for the website files. Click the Select button under Database backups and choose the database you want to download a backup of. Click the Show Databases button to see a list of the backups for this database. Download the most recent one.
How to restore a backup with Hostinger hPanel
Restore a backup with one-click
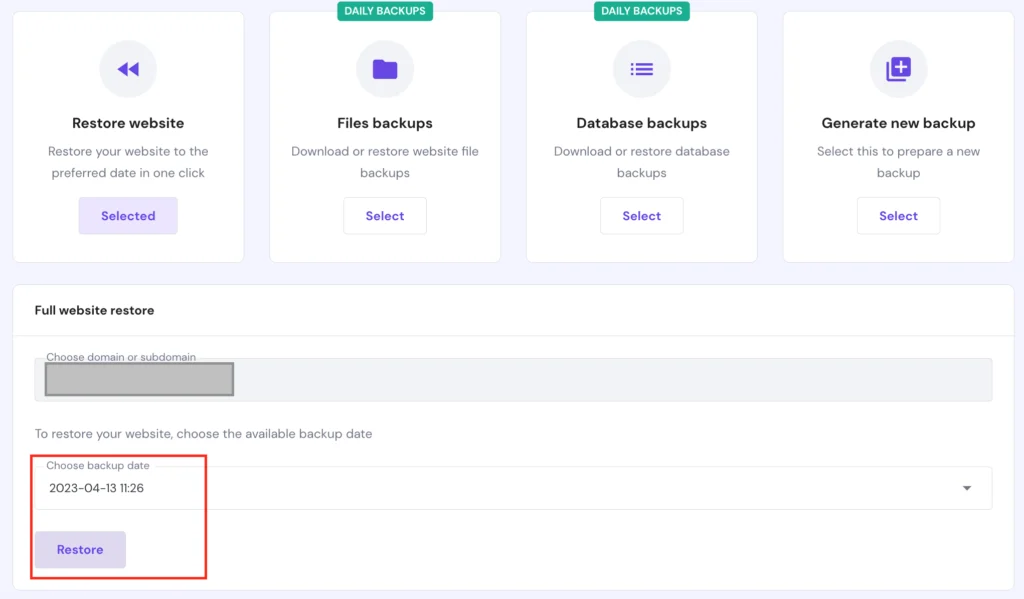
Hostinger has provided a one-click process for restoring a backup to its previous state, which includes files and the database. This simple process is achieved on the Backups page, which can be accessed from the dashboard as described above or navigating to Files > Backups.
Returning to the Backups page, select the first option: Restore website. This choice allows a complete restoration of the entire website with one click.
Choose the backup date and click on the Restore button. The restoration time depends on how big the site is, but normally, it takes a few minutes.
Restore files and the database individually
I have covered this step above, in the Download website file backups and Download database backups sections, but just to recap, you need to choose the date of the backup, and from there you can select the individual files you want to restore and recover the database.
FAQS
How do I completely backup a website?
There are multiple ways to take a backup of the entire site. You can do this with a plugin, take a backup using your web hosting backup feature (like the one offered by Hostinger) or download the files and folders using FTP.
Does Hostinger offer daily backups?
Yes. The types of daily backups depend on the hosting plan.
Should I backup my website?
Yes, you should definitely backup your site on a regular basis. A backup not created is a website lost!
Conclusion
Having automatic backups enabled is an ideal solution in case you ever forget to take a backup of your site. If automatic backups are not available with the hosting plan you have selected, always follow the manual backup procedure. Hostinger one-click process has made it very simple to take and restore backups.