
Do you know that you can schedule posts on WordPress to publish in the future? That’s right, you can do that, as well as unpublish and republish posts when needed. It sounds helpful, right? Especially when you have a tight timetable yourself? WordPress has a schedule post tool that helps you regulate your content online. You can write your articles ahead of time and schedule them for a later date. You can even set a time to automatically unpublish a blog post.
In this article, we will look at how to use the built-in WordPress schedule tool available with the Gutenberg editor. The guide will also cover the PublishPress Future plugin, which will grant you the extra functionality to set the status of a published blog post. This is a useful feature not available in WordPress.
Top 7 Reasons To Schedule Posts
Publishing posts on your website regularly is essential for the popularity of your blog. Many website administrators prefer to schedule posts in WordPress because it has a lot of benefits.
- It is a good media strategy that helps you stay on top of your schedule.
- Using the WordPress calendar will save you a lot of time and help you stay organized with your uploading tasks.
- Publishing your articles or posts at regular intervals will attract the audience to your site for more information.
- When you schedule your content for the future, you don’t have to worry about publishing it at a specific time.
- You can take a vacation and not worry about writing and publishing your posts for a while.
- Scheduling your posts gives your website a fresh look whenever they upload without requiring your presence online.
- You can time your posts to go online automatically at a time when web traffic is on the rise. Traffic time will increase the viewing rate of your posts. You don’t have to go through the trouble of posting during a high-traffic period.
How Do I Schedule Posts in WordPress?
Publishing on WordPress is easy. Unfortunately, scheduling it is not straightforward. It is not a difficult task. You only need to perform a few steps. However, the “Schedule“ button is not visible in the WordPress post. Due to this, many are unaware of the WordPress post scheduler function.
Before diving into how to schedule posts in WordPress, let’s look at the different types of post statuses WordPress supports. It is important to know the different types of status because you never know when one of these options may prove useful. Also, if you prefer to use a plugin, more flexibility and features for scheduling posts in WordPress may become available. So, having knowledge on hand is always beneficial.
- Publish: Status viewable by everyone.
- Future: posts that are viewable at a future date.
- Pending review: for a user who has publish authority.
- Draft: incomplete posts, that are viewable by the users, and do not have a publishing date.
- Auto draft: In auto draft, you can save your content while editing.
- Private: The content is viewable only by the user.
- Trash: As the status suggests, trash content
How Do I Schedule a Post With a Future Date in WordPress?
When you want to schedule a post for a specific date and time, use the built-in WordPress post scheduler feature. This auto-post schedule is quite helpful and easy to use. You do not need to install any plugins. You only need to set the date and time, and your post will be visible online when the scheduled data and time arrive.
Here are the steps you need to follow to publish a post with a future date in WordPress:
Step 1: Log into the dashboard and navigate to posts. Click on Add New Post to write a post or open an existing one you want to publish in the future.
Step 2: Once your post is ready, click the publish button at the top. It will open a sidebar. You must expand the publishing option to set the post for a future date. By default, it will appear as Publish: Immediately. You can adjust the date and time according to your requirements. You can also use the calendar to set a future date.
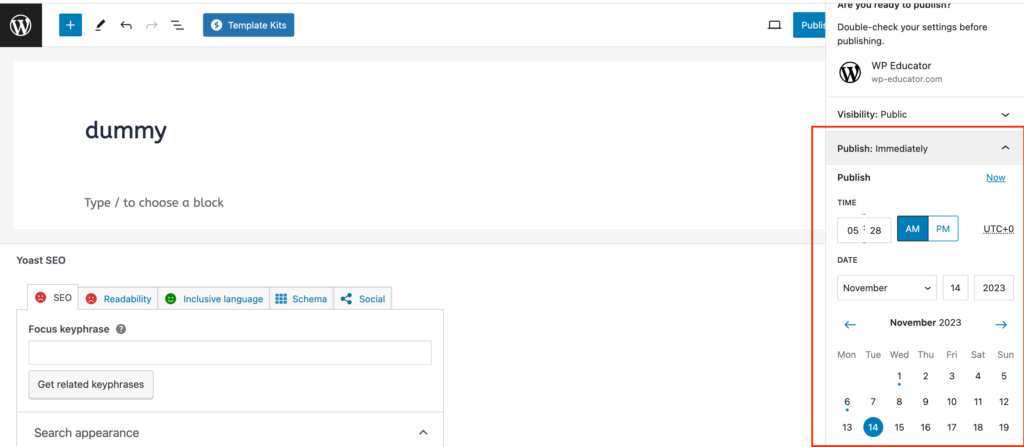
Step 3: When you select a date and time for the future, you will notice three changes in this section, informing you that scheduling is enabled for this post.
- The Publish: Immediately text will now show the future date and time.
- There will be a notification at the top. It will read: “Your work will be published at the specified date and time.”
- The Publish button will change to a Schedule button.
Step 4: Click the Schedule button to save your settings.
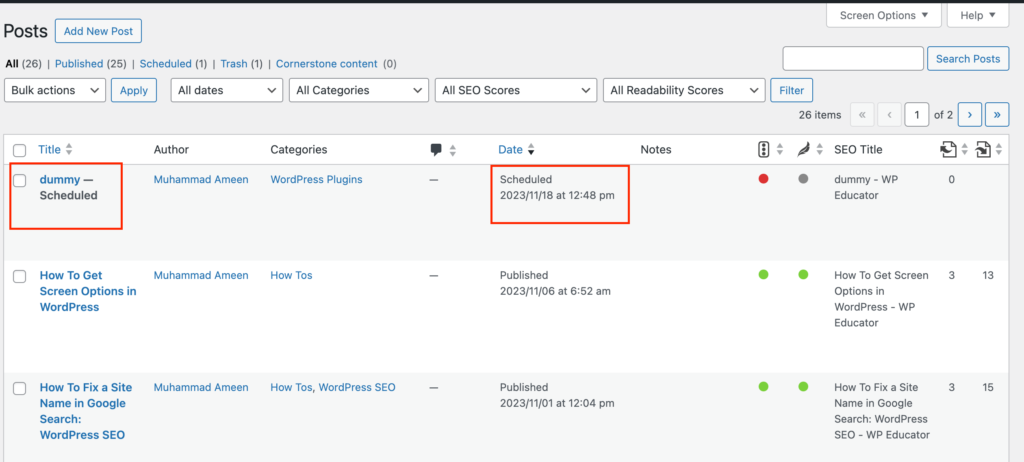
Another way to ensure that the post will be published in the future is through the Post Dashboard. Go to the post dashboard page. Over here, you will see two additional changes in the column to the post you recently set to schedule:
- The first is the title column. The text “Scheduled” will appear below the post title.
- The second is the date column, where you will see the scheduled text instead of the published text with the future date and time.
You can change the time and date of your post at any time.
How Do I Schedule a Post to Unpublish in WordPress?
You may probably be wondering if this is something strange. Why should someone want to schedule a post to be unpublished at a specific date and time? Before understanding why this is useful, let us first look into how to schedule a post to unpublish in WordPress.
WordPress itself doesn’t have a built-in feature to schedule a post to automatically unpublish at a specific time and date. However, to automatically unpublish WordPress posts we need the help of a plugin.
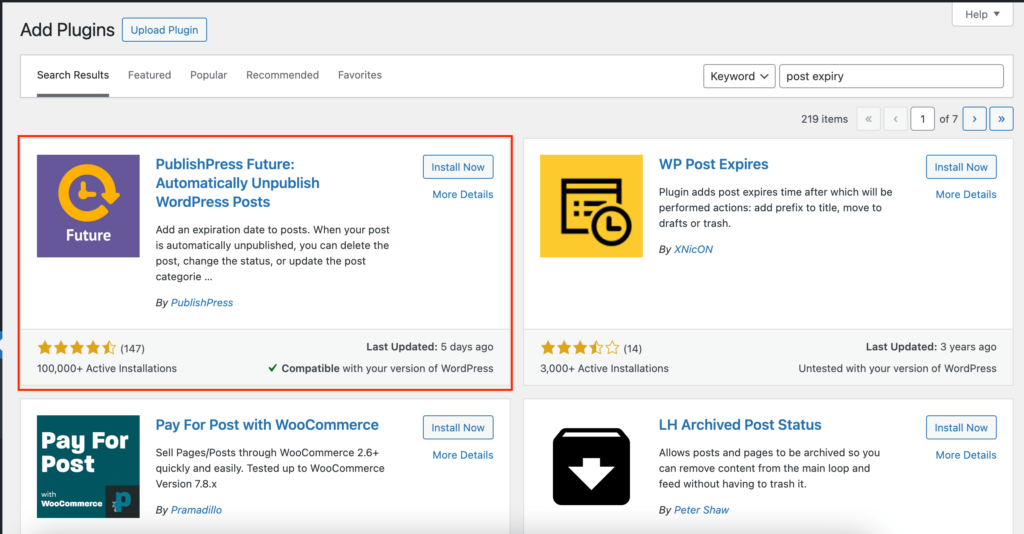
Step 1: Go to the WordPress plugin page and search for Post Expiry.
Step 2: Install and activate the PublishPress Future: Automatically Unpublish WordPress Posts plugin. But before you do so, make sure that the plugin is compatible with the current version of your WordPress. It is also best to make sure to update WordPress, plugins, and themes.
Step 3: Once the plugin is active, open a post that is currently published on your website. It should be the one you want to schedule to unpublish in the near future.
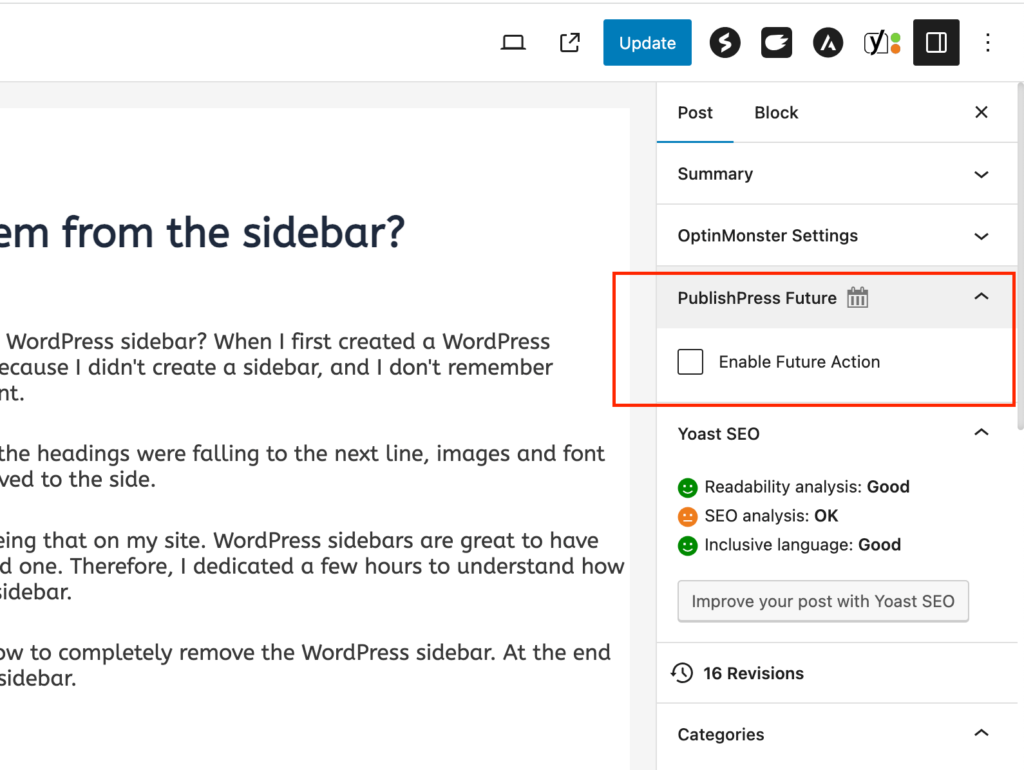
Step 4: On the right sidebar, you should see the PublishPress Future section. If you don’t see the right sidebar, you will need to open it. This right sidebar isn’t the same as the one mentioned above when you click on the publish button. The sidebar displays various settings and options for the current post. To make this sidebar appear, click on the settings button at the top right corner.

Step 5: Once you see the sidebar, look for the PublishPress Future section. Click to open it and enable the option, which will reveal additional publishing possibilities.
Step 6: The first thing you will see is the calendar. Set a future date when you want to schedule a post to be unpublished.
Step 7: After that, in the actions dropdown, set the status of the post to “Change status to draft” and click the “Update” button to save the changes.
Step 8: Now, in the post dashboard page, you will see an additional column called Future Actions. Once the scheduled date arrives, the post will automatically be unpublished and no longer visible on your website.
Instead of installing a plugin, you can do this manually. However, it isn’t recommended. Why? What if you need to unpublish a post when an offer expires at a certain time? What will you do then? If the expiration time is set for midnight, you will be losing your beauty sleep simply because you had to get up from your cozy bed to unpublish one blog post.
To save yourself the hassle of manually unpublishing posts, it is recommended to use the PublishPress Future plugin or any other WordPress post scheduler plugin. By utilizing this feature, you can ensure that your website remains up-to-date, especially when you want to unpublish time-sensitive posts.
Conclusion
Bloggers and website administrators often find the need to schedule posts on WordPress websites. Scheduling a post for a future date is the most common practice; however, wanting a post to be unpublished at a specific date and time can be useful in various scenarios. For example, if you have a limited-time offer or an event announcement that is only relevant for a certain period, scheduling the post to automatically unpublish ensures that it doesn’t remain visible on your website after its relevance has expired.
If you don’t want to use additional plugins because of the fear that your site might get hacked, then the only option is to publish and unpublish it manually. You can set a reminder for when to do it so that you don’t forget.
Very wonderful topic
Thank you 🙂 Remember to subscribe to the newsletter
There is something in this. Thanks for your help in this matter, now I will know.
You’re welcome 🙂
I fully share your opinion. An excellent idea, I agree with you.
Thank you
An incomparable topic, I really like it))))
Thank you!